Heroic Spine of Deathwing 10man Resto Shaman Pov

Welcome to Dragon Soul Heroic mode for the Spine of Deathwing. In this guide, I will run you through everything you need to know about how to best utilize your Resto Shaman spells and abilities for a healing showdown.
A lot of new goodies for the heroic version of this fight. You can bring 2 or 3 healers in a 10man raid the choice is yours depending on how high or low your dps is. The reason behind that is that in the heroic version of the fight the Burning Tendons, have so much life that you will need to dps them down twice before the plate explodes. This has a lot of ruminations for your raid.
Aside from all the additional damage that you will have to deal with AKA (as taken from Icy Veins )
• Grasping Tendrils (10-man/25-man)  now deal 12,000 damage per second in 10-man difficulty and 13,000 damage per second in 25-man difficulty, up from 6,000 and 6,500 respectively. Additionally, Grasping Tendrils now slow movement speed by 50%, up from 35%.
• Searing Plasma (10-man/25-man) now deals 12,000 damage every 10 seconds, up from 10,000. Additionally, it now absorbs 280,000 healing in 10-man difficulty and 420,000 healing in 25-man difficulty, up from 200,000 and 300,000 healing respectively.
•  Fiery Grip  now deals 90,000 damage every 3 seconds, up from 60,000.
• Superheated Nucleus (10-man/25-man) now deals 30,000 damage every 3 seconds in 10-man difficulty and 35,000 damage every 3 seconds in 25-man difficulty,, up from 15,000 and 17,500 respectively.
• Burst (10-man/25-man) now deals 14,000 damage in 10-man difficulty and 28,000 damage in 25-man difficulty, up from 10,000 and 20,000 damage respectively.
you will also be confronted with the following new mechanics :
Degradation  is a stacking debuff that is applied to all raid members each time a Hideous Amalgamation is killed. The debuff reduces the target’s maximum health by 5% per stack. It has an unlimited duration and it cannot be dispelled. Note that the debuff is only applied when a Hideous Amalgamation is actually killed, and not when they are disposed of through a Barrel Roll.
Blood Corruption: Death is a dispellable debuff that will regularly be placed on random raid members. It has a 15 second duration, at the end of which it will wipe the raid. When the debuff is dispelled, it jumps to another nearby target, retaining its remaining duration. After a varying number of dispels, it will mutate into a different debuff ( Blood Corruption: Earth) when jumping to the next target.
Blood Corruption: Earth is almost identical to Blood Corruption: Death. The only difference is that when this debuff runs out, the target receives one or two stacks of Blood of Neltharion. The amount of stacks depends on how many seconds were left on the Blood Corruption: Death debuff at the moment when it became Blood Corruption: Earth. Blood of Neltharion.  is a beneficial stacking debuff that reduces all damage taken by 20% per stack. It can stack up to a maximum of 2 times per player. This debuff’s purpose is to counter the negative effects from Degradation.
Everything that applies for the first plate applies for the rest of the plates only things are getting harder and harder mostly because for every Hideous Amalgamation that you kill, you get a stack of Degradation which effectively lowers all your raids health pool by 5%. Killing 2 Amalgamations every plate landing on the second plate will find you with 10% less health and landing on the third one will find you with 20% less health. By the time you blow up the last Amalgamation your raid will be at 30% less health making it harder and harder to keep your raiders alive.

Preparation

For a more in depth analysis of exactly all Spine’s of Deathwings old abilities I suggest reading the following guides.
1. Guides for Normal Spine of Deathwing
Spine of Deathwing Normal by Type H for Heals 
Spine of Deathwing Normal And Heroic by IcyVeins
TIP : Always watch some videos beforehand to be in the know.
2.Videos for Heroic Spine of Deathwing
Spine of Deathwing 10Man Dragon Soul Heroic FatBoss 
Spine of Deathwing 10Man Dragon Soul Heroic LearnToRaid

How to deal with dispelling

As a Resto Shaman you might be called to the task of dispelling. Generally its better if one healer is responsible for dispelling the new Blood debuffs. Resto Shamans have amazing tools to deal with dispelling while generating enough mana back to last them through the fight as will be explained later in this guide.
The way to handle with the new debuffs is to immediately dispel Blood Death until it has mutated to Blood Earth. Given the fact that once Blood Earth expires it leaves back the Blood of Neltharion buff, its imperative that you try and get both of your tanks 2 stacks of Neltharion buff as soon as possible. Again the way to do that is to keep dispelling Blood Earth until it lands on one of your tanks. After you have secured 2 stacks of the buff to each of them you can move on and let it naturally expire to the rest of your raid. I try to apply at least one stack after that to each of my raiders choosing the weakest one to start with. If you find you simply don’t have time or mana, you can opt out but when a member has 2 stacks you should dispel it in favor of someone with zero.
TIP : Blood Corruption: Earth used to mutate back to Blood Corruption: Death if it was dispelled enough times. This was hotfixed or hushed away at some point so you don’t need to worry about wiping your raid. Once Blood Death has mutated to Earth it will never mutate back again.
TIP : For this fight specifically it’s very important to be able to properly handle Blood Corruption: DeathBlood Corruption: Earth  AND navigate yourselves successfully in a way that you will land Blood of Neltharion  buff to the appropriate targets as soon as you possibly can. Blood Death and Blood Earth both will show on top of your Vuhdo depending your configuration but Blood of Neltharion and especially its stacks will not. The way to easily deal with dispels is the following :
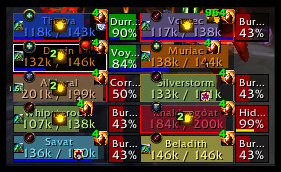
Add a distinct color on your raid frames to help you identify and separate Blood Death that will wipe your raid with Blood Earth. Vuhdo will recognize them both as debuffs and assign then with the same color, making it harder for you to identify them in the heat of the moment. I chose to color Blood Death black and left Blood Earth as it was. Below is a screenshot of how my Vuhdo looks like :

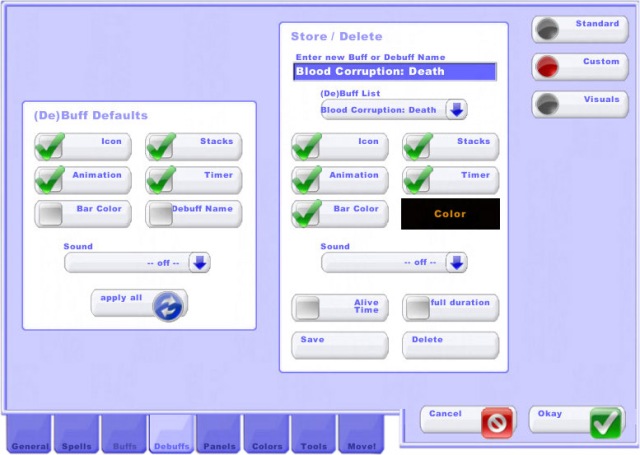
Notice that both of my tanks have 2 stacks each of Blood of Neltharion ( stacks are showing in the middle of each players frame ) and how there is one Blood Death already applied on one of my fellow healers. This way its easy for me to know immediately what kind of debuff is applied to which raider , who to dispel and in which priority. Below is my Vuhdo configuration needed to achieve these 2 effects.

Blood of Neltharion is not currently included in the default Vuhdo buffs. You can easily bypass this by adding it yourself. On the panel below simply click on the Enter new Buff os Debuff Name field and type Blood of Neltharion. Make sure the rest of the properties match the screenshot below and click on Save followed by Okey.

Suggested Raid Composition

2 Tanks – 2 Healers – 6 Dps  or  2 Tanks – 3 Healers – 5 Dps. This depends on how strong your healers are or how strong your dps is.

Gear and Reforging Check

For this fight any mastery oriented gear will do again. Personally though I retained my 2005 haste rating since my gear allows me to sustain that haste while stacking enough mastery.
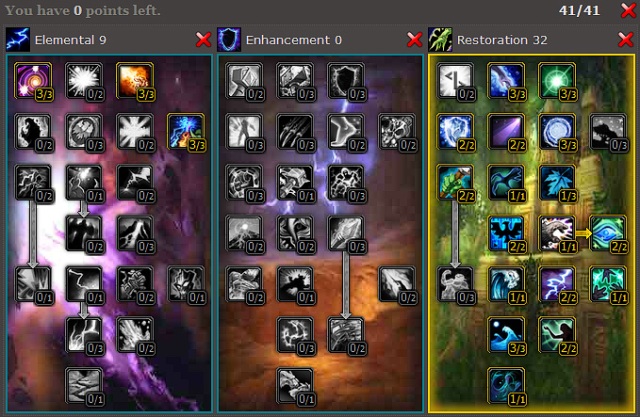
Equip your talent tree with Telluric currents to get mana back as well as do damage and Focused Insight to be able to amplify your healing throughput. Remove all points from Enhancement tree to facilitate more mana gain adding the rest of the points to the Elemental tree as seen below.
Instant ghost is not needed for this fight and if you are in charge of dispelling you will need to amplify your mana back from Telluric currents as much as possible. Be sure to add maximum points to Improved Cleanse Spirit and Cleansing Waters. Don’t be afraid to drop points from Ancestral Awakening , since you will be mostly running with Healing rains on CD you will barely get an procs of that. On my kill AA only contributed 1.6% of my total healing. Also the difference between adding 2 points to Cleansing Waters is about half of your mana pool. While I was specced out of it after I was finished with my dispelling I was left with barely 30% of my mana, whereas spending 2 points on that talent left me with 60 to 70% of my mana.
 Below is an example of how your talent tree should look like.

Below is an example of how your character should look like. Gear, reforging, talent tree and glyphs included.
CharDev Example with 404 gear and reforge details
Haste in this example is as close to 2005 as it gets.
Mastery should be above 19 or as close to it as possible for the extra healing it will provide you.
Spirit is little below 3300 (counting the proc from  Heart of Unliving) in order to have plenty to meet your needs.
All items used are from Normal and Heroic Dragon Soul.This is how my character looked like when I got into the fight, you might go into it with more of less gear. As always, if your gear is different just apply the rules above for potential reforges.

Fight starting in 5..4..3..2..1. Pull.’

First Plate. Before you start the fight make sure to earthshield the tank. As soon as you cut off the cinematic drop your totems and use any shock spell of your choice to any  Corruption . Drop a healing rain in between the stacking side where your raid will perform a roll and riptide any member affected by Searing Plasma .(More and more will be affected always start by casting a riptide on them if its of cooldown.) After casting healing rain start relocating to the stacking point and make sure you are gripped. Cast another shock spell to any corruption and depending on your timing either cast another healing rain at your location and drop spirit link totem or vice versa. At that point the rest of the healers will be probably be using their raid cooldowns too. If you are responsible for dispelling get ready to dispel from 1 up to 4 Blood Corruption Death from your team.
TIP: Before starting dispelling, make sure you have 10 stacks of spirit procs from your Heart of Unliving trinket if you have it, and drop your mana tide totem. It will help you as well as the rest of your healing team regenerate as much mana as possible while save you a lot of mana too. Using this method I am left with more than 70% mana after I am done with dispelling if not even more.
The Blood Death debuffs, will all start at 15sec and every time you dispel them that time will decrease. The debuffs will not all start at the same time but very close together so make sure to always dispel the one that has the least time left. At this point you need to concentrate at first getting rid of any Blood Deaths as they will cause an instant wipe if their timer runs out. As soon as they start mutating to Blood Earth you will need to try and dispel them from every member they might jump to until they land to any of your tanks and let them safely expire there. When they expire they will leave each one stack of Blood of Neltharion buff.Once you have 2 stacks on each of your tanks you can let Blood Earth expire in any member of your choice.
TIP: Its very hard to get both of your tanks to have 2 stacks each at the first plate but doable. However if you are straggling for mana make sure the tank that is responsible for tanking the bloods has priority and also make sure that you wont get to the third plate without having 2 stacks in each tank since they will require more and more healing.
Use your Spiritwalker’s Grace to take advantage of the 4pc bonus that will give you extra haste and begin a rotation of
1. Casting lightning bolts to the Amalgamation your tank is tanking while,
2. Making sure you keep up with his earth shield
3. Your own water shield
4. Recasting any missing or destroyed totems
5. Casting riptide on cooldown if possible on any members that just got the Searing Plasma debuff or the tanks if everyone is off the loop
6. Throw any shock spell of your choice at the Amalgamation and cast either healing rain or greater healing wave to whichever member has the highest stacks of Searing Plasma. You will be able to rotate through those 2 if you keep your cool. Note that of course you can break this theoretical rotation at any given point that a) any member is gripped for more than they should since you will need  to shock heal them to keep them alive, b) if for some reason the tank needs extra healing.
Keep following all of the above up until the first Amalgamation explodes. As soon as it does your dps will kill the last Corruption thus landing you with a Blood Death debuff to dispel. Be ready for it but at that point you don’t need to panic like before , if you handled 4 earlier this one will seem like a walk in the park. If you used your Spiritwalker’s Grace when I suggested earlier then you will have it again shortly after the first round of handling one of the Burning Tendons. Continue as above until the second Amalgation exlodes and deal with one more Blood Death dispel.
TIP: Try and dispel as much as possible and experiment at the first plate where healing is not as intense. You will notice the difference as soon as you step on the second and third plate when you will need to heal more and you wont have to deal with as many dispels.
Second Plate. Same exact logic as with the first plate with 2 differences.
1. You will notice that its much harder to keep your raid alive while rolling. Make sure your timing at dropping spirit link totem is on the spot.
2. There will be one less Blood Death to deal with since now there are only 3 Corruptions to kill.
3. You might get a delayed Blood Death debuff applied so I suggest waiting a few seconds before popping your Spiritwalker’s Grace. You want to take advantage of that haste in order to get as much mana back as possible and wasting it while you are dispelling will reflect on your regeneration.
4. Overall dealing with Blood Deaths will be easier because a.) They are less and b.) You will most likely have already dealt with applying stacks to the tanks so as soon as they mutate to Blood Earth you will not have to worry about them anymore.
Third Plate. The hardest plate to handle since you will have 20% reduced health pool and an immense amount of bloods that are threatening to either kill your tank or get out of aggro control. Be ready to heal fast whomever needs it and try to always be in control of the Searing plasma debuffs. It’s very easy to lose a member that is gripped at this point due to the fact that he wasn’t knocked out fast enough while having a high amount of time still remaining on his Searing plasma debuff along with his 20% or 25% reduced health pool. Be on the lookout for any bloods running towards you and if this happens run towards the tank that is supposed to tank them in order for him to take aggro of you. As always remember you need to dispel an additional Blood Death when the Amalgamation dies.
This concudes this guide for the Spine of Deathwing HC .Enjoy the fight and happy looting!
I will leave you with a screenshot of my UI while in fight for a better understanding of how important it is to configure your Vuhdo before hand. Numbers are flying and generally its chaotic so the easier you make it for yourself to successfully dispel without errors the better it will be for you and your raid.

BiS 4.3 Resto Shaman Shopping List

(For a more in depth analysis and for the daring reader feel free to feast on General Gearing, BiS 4.3 List and Tips : Where to start from and what to pick up down the Dragon Soul road)
And so tier 13 hit our doors along with Santa Claus this year but unlike small people, acquiring those coveted pieces has nothing to do with whether you’ve been naughty or nice. Quite honestly I feel that the more naughty I become the easier it will be to get that damn 4set pc bonus that I ve long argued with my resto druid friend who believes its his tree form reincarnated. Yeah right. Like I stash the book of dead under my bed at nights  in the hopes I ll restore some of the glory of what resto shaman used to have back in WoLK. Yes I m bitter. I m bitter that I ve felt for the whole tier 12 of Cataclysm and especially in Firelands that I ve been working my ass off to get just a glimpse of what a druid or a paladin could achieve by just  a wave of their wands. And you only need to look at diagrams of WoL to see the heart wrenching truth. That the blue line is ALWAYS on the bottom of the list. Whether up or high its ALWAYS on the bottom of that list. So yey I get a tree form to play. Tell you what drood, I d appreciate it more if I was a freaking dog cause then I d have something to piss on. I m deviating from my point though. My point being I started this post willing to record somewhere online a BiS 4.3 shopping resto shaman list for myself. It did get to my attention that a lot of shamies out there have no idea how dress. Meaning they don’t really know whether to stack haste or mastery. There are a lot of forums out there with beautiful numbers for that and depending on my mood I might make a collection to prove my point. However for now below you can find a Haste/Mastery oriented Best in Slot 4.3 for your  Shaman. At least its what I ll be dressing myself in.Reforge at your discretion.
 BIS 4.3 RESTO SHAMAN GEAR LIST For Dragon Soul

iLVL

SLOT

LOOT

SOURCE

397

410

Head

Wolfdream Circlet (Spirit/Haste)

Spiritwalker’s Faceguard(Spirit/Mastery)

Vendor

Token

397

410

Neck

 Petrified Fungal Heart(Spirit/Haste)

Morchoc

397

410

Shoulder

 Imperfect Specimens 27 and 28(Haste/Mastery)

Spiritwalker’s Mantle(Spirit/Haste)

Ultraxion

Token

397

Back

 Woundlicker Cover (Spirit/Haste)

Vendor

397

410

Chest

Spiritwalker’s Tunic (Spirit/Mastery)

Token

397

410

Wrist

Thundering Deathscale Wristguards(Spirit/Haste)

Grotesquely Writhing Bracers(Spirit/Mastery)

LeatherWorking Pattern

Zon’ozz

397

410

Hands

 Gloves of Ghostly Dreams (Spirit/Haste)

Spiritwalker’s Gloves ( Haste/Mastery)

Vendor

Token

403

416

Waist

Belt of Shattered Elementium(Spirit/Haste)

Spine of Deathwing

397

410

Legs

 Spiritwalker’s Legwraps(Spirit/Haste)

Token

397

410

Feet

 Sabatons of the Graceful Spirit(Spirit/Haste)

Mindstrainer Treads(Spirit/Mastery)

Vendor

Yor’sahj

397

410

Finger

 Band of Reconstruction (Spirit/Mastery)
Signet of Suturing(Spirit/Haste)
Ring of the Riven  (Haste/Mastery)

Vendor

Shared Boss Loot

Hagara

397

403

416

Trinket

Windward Heart (Int/Ancestral Awakening)
Heart of Unliving (Int/Spirit stacking)

Shared Boss Loot

Spine of Deathwing

397

403

410  416

Main Hand

Vagaries of Time  (Crit/Haste)
Scalpel of Unrelenting Agony  (Spirit/Haste)
Maw of the Dragonlord Dragon Soul (Frontal cone heal)

Morchok

Yor’sahj

Madness of Deathwing

397

410

Off Hand

 Timepiece of the Bronze Flight (Spirit/Haste)

Warmaster Blackhorn

397

Relic

Lightning Spirit in a Bottle (Spirit/Mastery)

Vendor

Note : Please ,for the people out there screaming BUT BUT THESE ARE NORMAL VERSION LEWTS! Yes they are. Quite obviously when you loot HC simply go for the 410 versions.Sheesh.
___ A  Resto Shaman blog for the Curious or the Lazy Raider___