Heroic Yor’sahj The Unsleeping 10man Resto Shaman Pov

Welcome to Dragon Soul Heroic mode for Yor’sahj The Unsleeping. In this guide, I will run you through everything you need to know about how to best utilize your Resto Shaman spells and abilities for a healing showdown.
Yor’sahj The Unsleeping has, much like Morchok The Douchekeeper , one main distinction from normal mode. It appears that he’s inspired by Alien so he spawns 4 oozes at a time instead of 3 hence leaving you with the option of having him absorb 3 at the end of their trail rather than 2. I remember when I first saw the normal version in PTR and in various early videos I was left thinking that blizzard has a sick sense of humor. Much like real life. Where you THINK  you have a choice when in reality you have almost none. There are 6 combinations that you will encounter randomly in no specific order in this heroic mode fight and in each you have mainly only one choice of what to kill. It sounds scarier than it actually is however.In order to help you with that I suggest installing the addon called Yor’sahj Automatic RaidWarnings  that calls out which ooze to kill and lets you know which ones are left.

The Contenders

 Purple – Gives everyone (except pets) Deep Corruption. Every time someone is healed, they get a stack. If they reach 5 stacks they explode, doing massive damage to the raid.
Red – Yor’sahj will cast Searing Blood on 8 random raid members, doing more damage the further away they are.
Green – Yor’sahj will cast Digestive Acid, which does moderate damage to random targets which will splash to everyone within 4 yards of them.
Yellow – Gives Yor’sahj Glowing Blood of Shu’ma which makes him attack 50% faster and use his abilities twice as often.
Blue – Creates a mana void. This will drain everyone’s entire mana pool. When it is killed it will explode and return the mana to everyone within 30 yards.
Black – Spawns small adds which will focus on random targets and use Psychic Slice.

Preparation

By this point you should have run at least once the normal mode of this fight. If you were thrown in the heroic version and you need a catch up below are some guides to help you better understand all the in and outs of this boss and for a more in depth analysis of what each ooze will do.
1. Guides for Normal Yor’sahj
Yor’sahj The Unsleeping Normal Mode from Icy-veins
Yor’sahj The Unsleeping Normal Mode from Type H For Heals
TIP : Always watch some videos beforehand to be in the know.
2.Videos for Heroic Yor’sahj
Yor’sahj The Unsleeping 10Man Heroic Dragon Soul FATBOSS
Yor’sahj The Unsleeping 25Man Heroic Dragon Soul LearnToRaid
Yor’sahj The Unsleeping 25Man Heroic Dragon Soul TankSpot
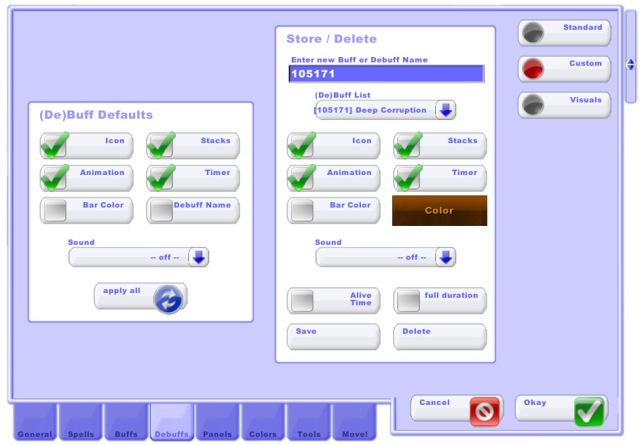
TIP : For this fight specifically it’s very important to be able to properly handle Deep Corruption so you will need to have it showing on your healing addon raid frames. The spell ID is 105171 and it’s name is Deep Corruption. If you have VuhDo  just go to your configuration screen on the Debuffs tab and then click on Custom. Make sure you have Stacks clicked on both columns then go and find the spell from the dropdown list.

Suggested Raid Composition

1 Tank – 2 Healers – 7 Dps

Gear and Reforging Check

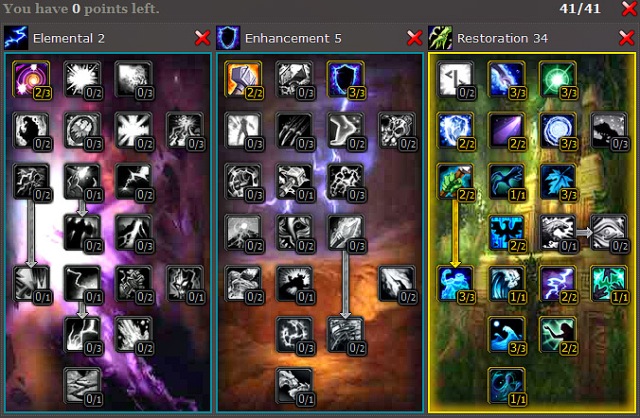
For this fight, you will need to be able to dump your mana fast enough in very little time in order to heal your raid. This boss is characterized of the huge amounts of dead time that provides to the healers, making this fight especially easy for Resto Shamans. Equip your talent tree with Telluric currents to get mana back when no healing is needed and Focused Insightto be able to amplify your healing throughput.You will mostly be stationary for the whole fight so feel free to sacrifice your ghost wolf and since no dispelling is necessary remove a point from that too. Below is an example of how your character should look like. Gear, reforging, talent tree and glyphs included.

CharDev Example with 397 gear and reforge details
Haste in this example is around 2005 in order to help you cast faster and give your riptide one more tick.
Mastery should above 18 or as close to it as possible for the extra healing it will provide you for when your raid hits all time lows.
Spirit is little above 3200 (counting the proc from Heart of Unliving ) in order to have enough to dump with your fast spells.
All items used are from Normal Dragon Soul as this is an entry level Heroic boss.

Preparation Tips and Tricks

Make sure your weapon is imbued with Earthliving Weapon enchant and your Water Shield is up .  Put Earth Shield on your tank and keep it up at all times .Start the tank so that your well spent Ancestral Healing talent points will proc that wonderful 10% damage reduction and 10% maximum health pool increase. After you see you can’t climb more on his health cast riptide on him.As long as riptide is ticking the stacks will never drop thus securing the tank an extra 10% damage reduction and health pool increase throughout all the fight.

Fight starting in 5..4..3..2..1. Pull.

Run with the tank and stand behind the boss. Drop your totems at your location.
Before the Oozes. Since nobody is getting any damage besides the tank focus on him. Renew his riptide if needed and heal him with greater healing waves or sustain him with healing waves if he doesn’t drop too low.
Casting of the Oozes. After a few seconds he will start casting for the first set of oozes. This is your major downtime where no healing whatsoever is required so as soon as the tanks health is full start casting lightning bolts to fill your mana pool back up.
Merging of the Oozes. Healing on this phase is very dependant of the combination of the oozes. There is a total of 6 possible combinations as following. Unless there is a green ooze up ALWAYS stack under the bosses bottom. No excuses if you don’t.
 —> Purple RedYellow Black
Kill Yellow to control some of the damage. With Red up you’ll need to stack and with purple up you will need to handle Deep Corruption . Below is a list of how all shaman spells and how they react to the debuff.
 —> Chain Heal1 stack for each person it bounces to. (Not recommended )
 —> Earthliving ProcsNO STACKS
 —> Earth ShieldNO STACKS
 —> Healing Rain1 stack upon entering.  If you leave and re-enter, you gain another stack.
 —> Healing Stream TotemNO STACKS
 —> Riptide1 stack on initial application
 —> Spirit LinkNO STACKS
 —> Unleash Elements (Earthliving) – 1 stack
Tip. Divide your raid into 2 groups of 5 before you start the fight.This way every healer will be left with a group of 5 to heal through.
Tank assignment. Refresh Earth shield if it drops and cast riptide just a sec before the oozes merge. Unleash your weapon at a hunters or warlocks pet if you can’t afford another stack on another member. This will boost your next direct heal for 20%. Remember your mastery will boost your heals the lower the targets health is, so feel free to allow the tank to drop a little below 50% before you heal him with a greater healing wave. You only have up until 4 heals before you blow him up and the raid so it’s crucial to maximize your heals as much as possible before you heal anyone. So while keeping an eye of the tanks health Unleash life and spam the boss with any shock spell to take advantage of your Focus Insight talent that will give you an additional boost. Always heal the tank with amplified greater healing waves.Keep your tidal waves up by casting riptide on cooldown which will gradually heal members up while only giving one stack and make your next casts much faster. If anyone is in danger heal them with greater healing wave.
Raid assignment with no tank. While you don’t have the tank to heal don’t forget to refresh his earth shield if its lost. Heal the raid members as stated above and have in mind to heal the tank in case of an emergency with an instant amplified greater healing wave. You may place a healing rain down, in a 10man it will not wipe the raid but have a discussion with the other healer first.
—> Purple Green Black Blue
Spread for more than 4 yards since Green is up. Handle Purple as above. With a twist. Depending if this is the first time you encounter Blue. If it’s the first time it will of course drain you of your mana.Drop mana tide totem to gain as much back as possible and if you can afford it cast lightning bolts at the boss. (If your raid uses the tact where you don’t kill the first mana void. At the second mana void your raid will kill the first so you’ll never run out of mana but in any case keep your mana tide totem for the possibility of running into a bad case of mana void. Otherwise always replenish your mana by casting lightning bolts during downtime. )
—> GreenRedBlue – Black
Stack since Red is up. Handle Blue as above. Drop healing rain on cooldown, refresh riptides on cooldown, chain heal from the lowest and cast greater healing waves at people that are fixated from the Black adds. If someone is in big trouble spam 2 healing surges on them followed by greater healing wave.
—> GreenYellow – Black – Red
This is the hardest combination.You should keep all your healing cooldowns for this.Start the phase by casting heroism (or anyone in the raid that can afford wasting mana on Heroism or Time warp.) Pop your Spiritwalkers Grace in you have a 4pc set bonus for the extra haste but save it for at least 10 sec into the phase. Converse with the other healer about when to drop your spirit link totem.Either start with it or drop is AS SOON as the other healers cooldown fades. Spam the boss with any shock spell on cooldown to amplify your next healing rain and keep casting chain heals in between.If anyone is low or even worse the tank use greater healing waves to patch them up.
—> Blue – Black – PurpleYellow
Handle Blue as above. Handle Purple as above.
 —> BluePurple GreenYellow
Spead 4 yeards and handle Blue and Purple as above.
This concudes this guide for the Heroic Yor’sahj  healing showdown.  Always cast lightning bolt while Yor’sahj is casting forth the oozes. Unless there is a Green Ooze up ALWAYS stack under the boss. And in case there is purple ooze up please DO NOT use chain heal. Enjoy the fight and happy looting!

Heroic Morchok 10man Resto Shaman POV

Welcome to Dragon Soul Heroic mode for Morchok. In this guide I’ll run you through everything you need to know about how to best utilize your Resto Shaman spells and abilities for a healing showdown.
Morchok has only one main difference from his normal version. When he reaches 90% of his health he’ll go into an early life crisis and develop a multiple personality disorder. It’s not treatable by medication and as you’ll probably have read in many guides like  Type H for Heals or Icy Veins your best option will be to divide and conquer. This will leave you with 2 teams of 5 ( or another set up for 25man ) and probably your team will include 1 tank, 2 healers and 2 dps.

Gear Check

Equip your shield if you haven’t already since Stomp is doing physical damage and your shield , for example Ward of the Red Widow will give you an extra 12201 armor which is equal to about 13.66% increase of damage mitigation bringing you to approximately 53% damage reduction depending on your gear. Your best bet as restoration shaman is to soak the damage with the tank while the other healer and the rest of dps run around soaking the damage from the Resonating Crystals. Fun times. The reason for this is that although as healers we bring a lot to our raid, the one thing we don’t bring is mobility. The less the restoration shaman has to move the more healing throughput he will have. Staying with the tank and having a good communication with him secures you with at least half as running around as you would have to run otherwise. (If your raid leader decides you won’t soak , then buckle up for some tough love )

Preparation Tips and Tricks

Make sure your weapon is imbued with Earthliving Weapon enchant and your Water Shield is up .Know your team and your tank. I suggest running with a good healing addon like Grid or Vuhdo that will keep your groups together. Put Earth Shield on your tank and keep it up at all times ( stating the obvious but ok ).Start overhealing yourself and the tank so that your well spent Ancestral Healing talent points will proc that wonderful 10% damage reduction and 10% maximum health pool increase. After you see you can’t climb more on your health riptide yourself and the tank. As long as riptide is ticking your stacks will never drop thus securing you and the tank an extra 10% damage reduction and health pool increase which will be life altering for this fight. Always refresh both riptides as they are about to expire and a small tip. Refresh the tanks right before you start running out for the black blood phase. This will secure him with the debuff even if he runs the opposite way of you so you don’t have to build it up as soon as you reach him again.

Fight starting in 5..4..3..2..1. Pull.

Run with the tank and drop your totems in between the location where Morchok is now and to where the tank will start tanking his split version. This way you get to benefit from your totems as much as possible without having to recast them and lose mana in the process. Have DBM ( or any other raid warning addon ) let you know when the stomp is coming. Depends on your healing assignment but probably you won’t have to heal your tank just yet. Be sure to keep him and yourself riptided and feel free to spend your third riptide at the raid member of your choice.
Tip. Remember you can only have 3 ppl riptided maximum in your raid if its glyphed so if you are unsure of your uptime keep it down to yourself and the tank. Best however to learn to always cast it on cooldown this will give you the most throughput.Fill your time before the first stomp with lightning bolts to keep your mana up ( provided you’ve spent points in Telluric Currents ).
Before the Stomp.Make sure you and the tank are as close to 100% health as you can get.When DBM tells you the stomp is being cast and has between 4 to 2 seconds left on the counter start casting healing rain ( If you have spend talent points in Focused Insight squeeze that in before the healing rain). This will ensure your rain coincides with the stomp timer perfectly thus minimizing your overhealing and saving you some precious mana.
After the stomp.Spam heal the tank who by that time will be gasping for air.There are many ways to do that, an effective one is either use an instant heavy heals macro (check my Resto Shaman Macros post for reference) or cast a riptide to keep your tidal waves up and consume both with Healing surge.Chain heal your group of 5 to as close to full health as possible and proceed to follow the tank and set camp at his location.The trick here is to put your healing rain in such a strategic location that it will include all 5 members of your party everytime you put it down. To that end ask your party to stay close enough and IN healing rain outskirts up until they need to run to take the damage of the crystal. (Now it depends if you are at the Morchok side or the Kohcrom side you will have different set of stomps and crystals. Healing wise the Morchok side is harder due to the fact it has one more additional stomp and one more crystal to deal with ). Be sure to keep your riptides on cooldown and as priority have yourself and the tank at full health before each stomp.Also don’t forget to spam riptide while running and unleash your weapon.I suggest you use unleash at the end of your run and cast a greater healing wave on the tank  if he needs it by that time.
Resonating crystal time.Once the resonating crystal spawns it takes 12 seconds to detonate.Within this time a stomp will occur, all 5 members need to soak that stomp before running to the crystal if this happened to spawn that far. Otherwise the tank is responsible to bring Morchok closer to the Chrystal to make it easier for the party. While Morchok is pounding on the tank try not to panic. Be on the lookout for every stomp and every crystal. Before the stomp make sure you and the tank are as close to 100% health as you can get. Achieve this by casting greater healing waves or chain healing the tank if you can afford to lose his riptide.
Before and after the next Stomp.3 seconds before the stomp cast healing rain and 1 second before the stomp cast greater healing wave on yourself.  Precasting that will land you with an immediate much needed heal as soon as your health drops. While healing rain, riptide and probably other hot procs are ticking on you and the tank chain heal the other 3 members that will already be running for the crystal. Drop healing rain at their location and by then the tank will have dragged Morchok close enough on them for him to be in that healing rain also.Run to his location as soon as you are done casting the rain, chain heal the 3 players that will soak the crystal damage and prepare yourself for the next stomp.If everything looks ok by this time squeeze in one or two lightning bolts and drop your mana tide totem.After it expires replace it with healing stream totem again and keep dropping it on cooldown preferably right before a black phase and right before a stomp.
Black Blood Phase.Repeat as above till the black blood phase. As soon as your feet hit the ground riptide the tank and leg it till you find a secure spot behind pillars. While on the run riptide yourself also and if someone needs little health unleash your weapon on him and start casting lighting bolts at the boss till the black blood phase ends from behind a pillar. Run towards the tank and pop spiritwalkers grace so you can heal on the run. Go through your healing rotation as above but before that make sure you re benefiting from your totems.Check your buffs and recast if needed. When your spiritwalkers grace is on CD heal with riptides and Unleash life. For the people with 4 pc set bonus.Make sure you keep one spiritwalkers grace for when the boss is below 20%.You will need it as soon as Heroism buff is over ( assuming you cast it at 20% of the bosses health ). If everything worked out the boss will be dead and you ll get hopefully a nice new bis neck piece to show off for your efforts.
Tip.For shamans with the 4 pc set bonus. Save your spiritwalkers grace for just before heavy stomps.
This concudes this guide for Heroic Morchok healing showdown.

Tips and quick summary

  1. Have your weapon enchanted, keep water shield on you and earth shield on the tank at all times.
  2. Preheal yourself and the tank for the extra  Ancestral Healing buff and keep riptides rolling on him and yourself to keep the buff going 100% of the fight.
  3. Precast Healing rain 3 seconds before each stomp ( provided you and the tank are as close to 100% health as possible ) and precast greater healing wave on yourself the last second.
  4. Cast Chain heal on the other 3 members while they are running for the crystal and drop a healing rain at their location. Run to the tank and heal him and yourself while preparing for the next stomp.Use a heavy instant heavy healing macro if you can’t afford the casting time or take advantage of your tidal waves that proced from either your previous chain heal or riptide and consume both with healing surge.Throw some extra heals on the rest of the party. Fill your downtime if any with lightning bolts.
  5. Before the first Black blood phase drop mana tide totem and keep dropping it on cooldown after that. Remember to recast healing stream totem after mana tide is exhausted.
  6. As soon as Black Blood phase is active riptide the tank on the run and yourself , unleash weapon to a member than needs it and as soon as you are safe start casting lightning bolts behind a pillar.
  7. Pop spiritwalkers grace on your way back to the tank and prepare for the next black blood phase as above after step 3. Recast your totems if you feel they are too far away from your location.
  8. Pop Heroism on 20% of the bosses health and if you have 4pc set bonus remember to cast it as soon as hero fades.
Note to the wise. Healing is an art, its not about rotation. Also its about collaboration with your fellow healers and your tanks. Be intuitive and expect damage spikes. Make macros for instant heals when in need ( Check my post on Resto Shaman Macros if you need a heads up ) and don’t be afraid to dump your mana but with consideration to what is coming.In between the steps I mentioned of course you need to use your spells to fill in healing wherever needed.Also do I really need to say that you need to be able to know when to keep your tidal waves up so your spells are the most quicker and most efficient? If your instincts are right on spot then you should be able to heal even with low gear. One of my most memorable times on this boss is when I dropped dead like a noob right after the first split. I used my anhk to rez myself which left me with almost 10% of my mana. I still hit almost the same numbers of healing albeit I was sweating the whole fight.And we downed him. It was then that I started to wonder that maybe we re mana spoiled and that we can make due with less if we re smart about our downtimes. I don’t suggest you start a fight with 10% mana though. You don’t want your fellow healers to pop beta blockers just for your fun of it.