


Glyph of Water Shield: Friend of Foe?
Glyphs in Mists of Pandaria saw a complete revamp not just in their interface panel but also in their utility. Prime glyphs were completely removed and most of Major glyphs got a significant nerf in terms of the advantages they offer. While some still offer a straight off bonus (sometimes not even significant enough to justify occupying a Major glyph slot), most of them introduce a trade-off faction which most of the times is hard to calculate. Glyph of Water shield has already caused a lot of controversy between shamans.

I am shamelessly quoting myself from my thread over at Elitist Jerks [Resto] Raid Healing 5.1 MoP :
Water Shield gives you a passive 2138 Mp5, but every time a hit will trigger it you will also gain 2928 mana. If triggered every time on ICD, it would give you an average of 4880 mp5. This is unrealistically high, however. Water shield comes with a glyph that reduces its passive mana regen by 15% reducing it to 1817 mp5. On the same note it will increase its on hit regen by 50% making it 4392 per hit amounting to 7320 mp5. In any fight where water shield reliably triggers more than 2.63 times every 1 minute, this glyph will give you a significant boost in mana regen.
Here comes the interesting part and what causes the controversy among Restos desperately seeking for some extra mana. You would think that Water shield glyph would be mandatory since it only needs to be activated 2.63 per min in order to provide better mana regen. It does right? Right?? Wrong answer. This has been a question I have been asking myself since beta came out. The times WS needs to be activated seem very few, however the number of attacks that actually do that was significantly lowered for Mists. And while still supposedly no AoE will proc it, some still does. And while also supposedly direct damage will proc it,some doesn’t. Blizzard is being very liberal with its boss abilities and the categories they fit. The only way to reliably calculate Water Shield gains ( glyphed or not glyphed ) is by analyzing logs. and therefore putting down once and for all the conundrum of whether Water Shield glyph is useful or not.
For my analysis I used World of Logs and an array of what is mostly my kills and top ranked resto shaman kills. While the number of times that WS activates will vary from fight to fight expect that in the table below the numbers show what is mostly the most efficient way to deal with any boss fight , meaning avoiding all the bad. Some we can’t avoid but for those we can consider for the most part they were avoided for calculating purposes. I want to make the table as fair as possible in respect of boss fights and incoming damage. If you have been hit twice as much in a specific fight shown below, you just tanked the floor for more than you should have. It’s by no means an excuse that Water Shield glyph is better in that specific fight or in general. Getting hit just to activate your WS will get you some mana back but you will most likely be spending it in order to get your HP back up.
You can find the table below in downloadable format at Boss List Water Shield gains – Unglyphed vs Glyphed.
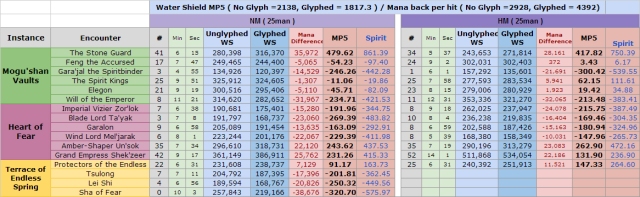
There are 2 columns, one for Normal Mode encounters and on the far right one for Heroic Mode encounters (I will update the post once I have data for the last 3 bosses). Results for MP5 and Spirit columns are tailored for each fight according to its duration. From left to right:
1. Number of times shield was activated
2. Duration of the fight
3. Total mana gains while WS is not glyphed (ticks and passive)
4. Total mana gains while WS is glyphed (ticks and passive)
5. Mana difference (always subtracting Unglyphed WS from Glyphed WS. This means that when the number is positive Glyphed WS is favorited and when it’s negative Unglyphed WS is favorited)
6. MP5 (based on the difference)
7. Spirit (based on the difference)
The results of the table are very surprising and prove that Water Shield glyph not only is not a necessary glyph but in fact in most of the fights it will result to mana loss rather than mana gain. What is most interesting is fights were the difference is very little and using either will result in almost similar results. For readers that might be wondering “Well a gain is always a gain why not just use it for the fights where using the glyph is marginally better? ” I have one answer. Just don’t. Plainly and directly. Don’t. Assign another glyph in its place instead. Anything will be more useful than gaining or loosing 30 or 5 points of spirit or even 150. Remember for the fights where it seems that we are gaining 200spirit (which someone might argue is a useful gain ) ,it only takes a little bit more awareness and either getting hit 2 or 3 times less or the fight to last 15 seconds less to reduce the difference to a point that is again completely irrelevant. There is no point whatsoever in using this glyph other than The Stone Guard and Amber Shaper and even for those fights consider that using the Glyph of Totemic Recall will reward you full mana upon retracting your HST. HST costs 14100 mana and spending 2GCDs throughout the whole fight will award you more theoretical mp5 and spirit than Glyph of Water Shield would ever reward even in its highest mana back.
We can plainly see that in every single occasion it’s better to run without Glyph of Water Shield. Not all glyphs in Mists of Pandaria are supposed to give you an advantage however I have to admit this is one glyph that most of the times puts you in disadvantage. You can safely disregard it and forget of using it as results and continuous testings in all bosses of this tier prove that it’s almost obsolete. I would be willing to say that unless it’s buffed in some way for the next patch we will probably reach the same conclusion also. Personally I am just happy that we don’t have to refresh it anymore. I have already forgotten we can Glyph it.
Heroic Garaj’al the Spiritbinder 25man Resto Shaman PoV
Welcome to Mogushan Vaults Heroic mode for Garaj’al the Spiritbinder in Mists of Pandaria. In this guide, I will run you through everything you need to know about how to best utilize your Resto Shaman spells and abilities for a healing showdown.
You can bring 4 or 5 healers in a 25man raid the choice is yours depending on how high or low your dps is. However using 5 healers will mean that you are generally cutting it short on tight enrage timer.
TIP : Enrage will hit much like Ultraxion’s enrage which will wipe all of your party instead of targeting solo players. There is simply no workaround of that mechanic.
Garaj’al’s most prominent ability is his Spirit totems which he will summon every 20 seconds. As a healer what you need to know is when is your turn to launch yourself in that circle of 6 yards along with 4 more players and be ready to cross to the spirit world for 30 seconds. While within the Spirit realm you will need to deal with Spiritual Innervation which stacks on healers and DPS. This will be analysed further below.
TIP : Remember that once you have left Spirit Realm, you cannot enter it again for the next 30 seconds or you will die instantly.
Another one of Garaj’al’s abilities healers need to be aware of is Voodoo Dolls. Voodoo Dolls effect will last for 60 sec and will be applied to 3 party members one of which will be the tank. (As soon as the Voodoo Dolls debuff expires from the tank, Garaj’al will cast the Bunisment spell on him, which will send him to the spirit world). 70% of the damage taken by each Voodoo Doll is also dealt to the other Voodoo Dolls so tank cooldowns are advised as they are the only way of dealing with that damage. Voodoo Dolls cannot enter the Spirit World (such as through the use of Spirit Totems).
TIP : Personal cooldowns such as Astral Shift will not mitigate any damage. Such cooldowns should be saved for when you are entering the spirit world or after Garaj’al reaches 20% of his health. Also remember you cannot enter the Spirit Realm if Voodoo Dolls debuff is applied to you.
The last 2 noteworthy abilities are the Shadowy Attack that Garaj’al will unleash every 8 sec to the tank that has aggro and Frenzy. Upon reaching 20% of his health Garaj’al’s attack speed will increase by 50% and his damage will be buffed by 25% .This will last until the end of the fight.
Preparation
1.For a more in depth analysis of exactly all Garaj’al’s old abilities I suggest reading the following guides.
Garaj’al the Spiritbinder Normal And Heroic by IcyVeins
TIP : Always watch some videos beforehand to be in the know.
2.Videos for Garaj’al the Spiritbinder
Gara’Jal the Spiritbinder 25 Man Heroic Guide – FATBOSS
Gara’Jal the Spiritbinder 25 Man Heroic Kill video – by Pure
Vuhdo Configuation for Voodoo Dolls
Depending on when you decide to tackle this fight Voodoo Dolls debuff might not show on your Vuhdo. It is imperative that you know which targets are affected as you will need to heal them intensively for 60 seconds. By default Vuhdo will presume that you don’t need extra icons so first thing you need to do is open Vuhdo ->Debuffs -> Standard. Click on the Icon and save as demonstrated below. If you want only raid icons to show go ahead and click on the Boss icon also. I prefer it but it might not be for everyone.

The way to add any custom debuff on Vudho is by opening the interface and navigating to Vuhdo ->Debuffs -> Custom, adding the exact name of the debuff you want to track under Enter new Buff or Debuff Name and saving it as shown below.

…
How to deal with Spiritual Innervation in the Spirit Realm
One of the most discussed matters between healers for this fight due to its ambiguous ingame tooltip. Vixsin from Life in Group 5, was kind enough to shed some light early on to what further testings proved to be the way to handle this buff. Spiritual Innervation will grand a healer with stacks of spirit which will increase their mana regeneration for as long as the buff lasts which is set on 30 seconds. Mechanics around how we gain stacks are not clear ingame. However testings show that any HoT applied to the target that will add stacks will also refresh the buffs timer and any direct cast heavy hitting spell will apply at least one stack. (If you want to know more about stacks and for all classes? Dedralie over at Heliocentric wrote an excellent very detailed post about this. Trust me, you want to read it). It is important that while in the spirit realm you buff yourself and the DPS that accompany you as they are gaining Spiritual Innervation for DPS, and they are buffed depending of their class dealing increased damage for the duration of the buff. The best way to deal with this is pre HoT everyone ( Rolling Riptides to the team that is to enter the realm and yourself ) and as soon as you are in, start casting Healing Surges to top everyone up. Since mana is not an issue feel free to use as many Healing surges as needed in order to top your team because you only have 30 seconds before you escape Spirit Realm before you instantly die. As soon as any member is on full health a new action button will appear on their interface called Return Soul which will allow them to return to the normal realm. It is advised that you don’t overstay your welcome in the spirit realm and leave as soon as you have enough stacks on you and your DPS.
TIP : Healing Tide Totem and AG do not add or refresh stacks of Spiritual Innervation so if you are opting for this talent use it when your raid calls for it in the normal realm.
TIP : Use Ascendance in coordination with Healing surge the first time you enter the Spirit realm.
TIP: Dedralie over at Heliocentric has an excellent guide of how to track your Spiritual Innervation buff by using weak auras. You can find my own Power Auras equivalent at Resto Power Auras for MoP
Suggested Raid Composition
2 Tanks – 4 Healers – 19 DPS or 2 Tanks – 5 Healers – 18 DPS
TIP : Run with 4 Healers if you are just hitting enrage.
Gear and Reforging Check
For this fight it is suggested that you try and rotate in the spirit realm all your healers at least once. This way you can forgo large chunk of your spirit for secondary stats without feeling the pressure of an empty mana bar.
Talents in MoP and glyphs can be rearranged before every fight so don’t hesitate to play around. For this fight there are 2 different options for sets of talents and it really depends on how comfortable you feel with either of them in correlation with your gear.
The first set of talents utilizes Elemental Mastery and Ancestral Guidance. By forgoing your additional 5% haste rating you make yourself essentially unstoppable in the spirit realm. By combining the 30% haste of Elemental Mastery with Ancestral Guidance the first or second time you enter the spirit realm and Ascendance the second, you are guaranteed to provide the most stacks for yourself and your party with seconds to spare for when you exit spirit realm. Both of them can be used when Garaj’al is below 20% health and the fight becomes very intense healing wise.Remember for this build you will need to reforge to 3039 haste rating.

The second set utilizes Ancestral Swiftness in conjunction with Healing Tide Totem. The benefits of this set rest to the fact that it’s easier for you to reach your second haste cap at 3764 haste rating empowering this way your HTT and HST with one more tick.
TIP : Best choose Healing Tide Totem talent when you know you can reach enough haste that you will get that extra tick.

TIP : Remember that the first combination requires enough mana in order to be effective, if you are running oom you will find no use for it. The second set requires no mana in order to work.
Below is an example of how your character should look like. Gear, reforging, talent tree and glyphs included.
1. CharDev Example with 477 gear and reforge details for the first set of talents.
Haste in this example is as close to 3039 as it gets. Since you didn’t choose AS you are missing 5% haste , 3039 is the equivalent of 871 with AS. For more detailed info on Haste breakpoints refer to the Haste section of my guide on Elitist Jerks.
Mastery should be above 50% or as close to it as possible for the extra healing it will provide you and whatever is left we can safely allocate to crit.
Spirit is little below 7000 ( 6791) since the fight mechanics are such that unless you are unlucky with your rotation you will have enough mana to heal through.
2. CharDev Example with 477 gear and reforge details for the second set of talents.
Haste in this example is as close to 3764 as it gets.You need this much for the extra tick it will provide for HTT and HST. For more detailed info on Haste breakpoints refer to the Haste section of my guide on Elitist Jerks.
Mastery should be above 50% or as close to it as possible for the extra healing it will provide you and whatever is left we can safely allocate to crit.
Spirit is little below 7000 ( 6791) since the fight mechanics are such that unless you are unlucky with your rotation you will have enough mana to heal through.
3.Glyphs
You will need Glyph of Riptide for this fight as it is important that you pre HoT every member of the team that will go in the spirit realm before hand. Other than that the choice is yours.
TIP : Glyph of Water shield should not be used for this fight as there is almost no damage to proc it.
Fight starting in 5..4..3..2..1
As always before tank pulls, make sure you have applied Earth Shield on the tank that will start the encounter and you have prehealed him enough (along with the other tank ) so their health is buffed by 10%. Drop Earth Elemental Totem and have it Empower you followed by Healing Stream Totem. Fill in these 15seconds with Healing surges and riptides to the party members that have been affected with the Voodoo Dolls debuff. As soon as HST vanishes drop Mana Tide Totem for yourself and the rest of the healers. Use the rest of the Elementals as soon as they are available and off CD but remember to keep the last Earth Elemental for the last minute of the fight for the extra 20% damage reduction it will offer you and the extra damage reduction cooldown. Drop MTT on cooldown as well but also remember to keep one for the last 40seconds of the fight when all the healers will need that extra mana. After this the rest of the fight becomes borderline rotational depending on what phase you are.
Spirit Realm. Before you enter the spirit realm make sure you roll riptides to all of the party members that will enter with you. If it’s the first time you enter , depending on what talents you chose either cast Ascendance and start casting Healing Surges to everyone (make sure you start with yourself) until everyone is topped off so they can leave the realm whenever they want, or push for Elemental Mastery+Ancestral Guidance, thus saving Ascendance for the second time you go in. If you chose the second set of talents start with Ascendance and for the second time you get teleported if you find yourself unable of topping people off drop HTT. Its highly advisable that you don’t however since it neither adds stacks nor refreshes the Spiritual Innervation timer. Try to drop HST instead for the extra help.
Normal Realm. While you are outside there are 2 phases. First the phase that follows as soon as you have exited Spirit Realm. After that for 30seconds you will have infinite mana so cast as many Healing surges with Riptides as you can. Once your buff fades you enter a semi conservation phase, where you will heal Voodoo Dolls with Greater Healing Waves, cast Unleash Life before casting any Healing Rains, and using any cooldowns you might still have to help out with tough healing patches. Remember the more adds are still alive in the Spirit realm, the more damage they deal to random members out in the normal realm aside from the damage Voodoo Dolls will apply to specific targets.
Frenzy. When Garaj’al enters Frenzy phase, nobody will enter the spirit realm again and he will stop spawning totems. This part of the fight is very healing intensive since Garaj’al’s damage is buffed by 25% and his attack speed by 50%. Note that you will need to have all your cooldowns ready for this final part of the fight in order to keep the raid alive. Supplement with Chain Healing the tank that has aggro ( earth shield and riptide will buff your chain heal by 20% on the tank and 25% overall ), and cast buffed Healing rains on cooldown.
This concudes this guide for Garaj’al the Spiritbinder HC .Enjoy the fight and happy looting!
Heroic Spine of Deathwing 10man Resto Shaman Pov
Welcome to Dragon Soul Heroic mode for the Spine of Deathwing. In this guide, I will run you through everything you need to know about how to best utilize your Resto Shaman spells and abilities for a healing showdown.
A lot of new goodies for the heroic version of this fight. You can bring 2 or 3 healers in a 10man raid the choice is yours depending on how high or low your dps is. The reason behind that is that in the heroic version of the fight the Burning Tendons, have so much life that you will need to dps them down twice before the plate explodes. This has a lot of ruminations for your raid.
Aside from all the additional damage that you will have to deal with AKA (as taken from Icy Veins )
• Grasping Tendrils (10-man/25-man) now deal 12,000 damage per second in 10-man difficulty and 13,000 damage per second in 25-man difficulty, up from 6,000 and 6,500 respectively. Additionally, Grasping Tendrils now slow movement speed by 50%, up from 35%.
• Searing Plasma (10-man/25-man) now deals 12,000 damage every 10 seconds, up from 10,000. Additionally, it now absorbs 280,000 healing in 10-man difficulty and 420,000 healing in 25-man difficulty, up from 200,000 and 300,000 healing respectively.
• Fiery Grip now deals 90,000 damage every 3 seconds, up from 60,000.
• Superheated Nucleus (10-man/25-man) now deals 30,000 damage every 3 seconds in 10-man difficulty and 35,000 damage every 3 seconds in 25-man difficulty,, up from 15,000 and 17,500 respectively.
• Burst (10-man/25-man) now deals 14,000 damage in 10-man difficulty and 28,000 damage in 25-man difficulty, up from 10,000 and 20,000 damage respectively.
you will also be confronted with the following new mechanics :
• Degradation is a stacking debuff that is applied to all raid members each time a Hideous Amalgamation is killed. The debuff reduces the target’s maximum health by 5% per stack. It has an unlimited duration and it cannot be dispelled. Note that the debuff is only applied when a Hideous Amalgamation is actually killed, and not when they are disposed of through a Barrel Roll.
• Blood Corruption: Death is a dispellable debuff that will regularly be placed on random raid members. It has a 15 second duration, at the end of which it will wipe the raid. When the debuff is dispelled, it jumps to another nearby target, retaining its remaining duration. After a varying number of dispels, it will mutate into a different debuff ( Blood Corruption: Earth) when jumping to the next target.
• Blood Corruption: Earth is almost identical to Blood Corruption: Death. The only difference is that when this debuff runs out, the target receives one or two stacks of Blood of Neltharion. The amount of stacks depends on how many seconds were left on the Blood Corruption: Death debuff at the moment when it became Blood Corruption: Earth. Blood of Neltharion. is a beneficial stacking debuff that reduces all damage taken by 20% per stack. It can stack up to a maximum of 2 times per player. This debuff’s purpose is to counter the negative effects from Degradation.
Everything that applies for the first plate applies for the rest of the plates only things are getting harder and harder mostly because for every Hideous Amalgamation that you kill, you get a stack of Degradation which effectively lowers all your raids health pool by 5%. Killing 2 Amalgamations every plate landing on the second plate will find you with 10% less health and landing on the third one will find you with 20% less health. By the time you blow up the last Amalgamation your raid will be at 30% less health making it harder and harder to keep your raiders alive.
Preparation
For a more in depth analysis of exactly all Spine’s of Deathwings old abilities I suggest reading the following guides.
1. Guides for Normal Spine of Deathwing
Spine of Deathwing Normal by Type H for Heals
Spine of Deathwing Normal And Heroic by IcyVeins
TIP : Always watch some videos beforehand to be in the know.
2.Videos for Heroic Spine of Deathwing
Spine of Deathwing 10Man Dragon Soul Heroic FatBoss
Spine of Deathwing 10Man Dragon Soul Heroic LearnToRaid
How to deal with dispelling
As a Resto Shaman you might be called to the task of dispelling. Generally its better if one healer is responsible for dispelling the new Blood debuffs. Resto Shamans have amazing tools to deal with dispelling while generating enough mana back to last them through the fight as will be explained later in this guide.
The way to handle with the new debuffs is to immediately dispel Blood Death until it has mutated to Blood Earth. Given the fact that once Blood Earth expires it leaves back the Blood of Neltharion buff, its imperative that you try and get both of your tanks 2 stacks of Neltharion buff as soon as possible. Again the way to do that is to keep dispelling Blood Earth until it lands on one of your tanks. After you have secured 2 stacks of the buff to each of them you can move on and let it naturally expire to the rest of your raid. I try to apply at least one stack after that to each of my raiders choosing the weakest one to start with. If you find you simply don’t have time or mana, you can opt out but when a member has 2 stacks you should dispel it in favor of someone with zero.
TIP : Blood Corruption: Earth used to mutate back to Blood Corruption: Death if it was dispelled enough times. This was hotfixed or hushed away at some point so you don’t need to worry about wiping your raid. Once Blood Death has mutated to Earth it will never mutate back again.
TIP : For this fight specifically it’s very important to be able to properly handle Blood Corruption: Death, Blood Corruption: Earth AND navigate yourselves successfully in a way that you will land Blood of Neltharion buff to the appropriate targets as soon as you possibly can. Blood Death and Blood Earth both will show on top of your Vuhdo depending your configuration but Blood of Neltharion and especially its stacks will not. The way to easily deal with dispels is the following :
Add a distinct color on your raid frames to help you identify and separate Blood Death that will wipe your raid with Blood Earth. Vuhdo will recognize them both as debuffs and assign then with the same color, making it harder for you to identify them in the heat of the moment. I chose to color Blood Death black and left Blood Earth as it was. Below is a screenshot of how my Vuhdo looks like :

Notice that both of my tanks have 2 stacks each of Blood of Neltharion ( stacks are showing in the middle of each players frame ) and how there is one Blood Death already applied on one of my fellow healers. This way its easy for me to know immediately what kind of debuff is applied to which raider , who to dispel and in which priority. Below is my Vuhdo configuration needed to achieve these 2 effects.

Blood of Neltharion is not currently included in the default Vuhdo buffs. You can easily bypass this by adding it yourself. On the panel below simply click on the Enter new Buff os Debuff Name field and type Blood of Neltharion. Make sure the rest of the properties match the screenshot below and click on Save followed by Okey.

Suggested Raid Composition
2 Tanks – 2 Healers – 6 Dps or 2 Tanks – 3 Healers – 5 Dps. This depends on how strong your healers are or how strong your dps is.
Gear and Reforging Check
For this fight any mastery oriented gear will do again. Personally though I retained my 2005 haste rating since my gear allows me to sustain that haste while stacking enough mastery.
Equip your talent tree with Telluric currents to get mana back as well as do damage and Focused Insight to be able to amplify your healing throughput. Remove all points from Enhancement tree to facilitate more mana gain adding the rest of the points to the Elemental tree as seen below.
Instant ghost is not needed for this fight and if you are in charge of dispelling you will need to amplify your mana back from Telluric currents as much as possible. Be sure to add maximum points to Improved Cleanse Spirit and Cleansing Waters. Don’t be afraid to drop points from Ancestral Awakening , since you will be mostly running with Healing rains on CD you will barely get an procs of that. On my kill AA only contributed 1.6% of my total healing. Also the difference between adding 2 points to Cleansing Waters is about half of your mana pool. While I was specced out of it after I was finished with my dispelling I was left with barely 30% of my mana, whereas spending 2 points on that talent left me with 60 to 70% of my mana.
Below is an example of how your talent tree should look like.

Below is an example of how your character should look like. Gear, reforging, talent tree and glyphs included.
CharDev Example with 404 gear and reforge details
Haste in this example is as close to 2005 as it gets.
Mastery should be above 19 or as close to it as possible for the extra healing it will provide you.
Spirit is little below 3300 (counting the proc from Heart of Unliving) in order to have plenty to meet your needs.
All items used are from Normal and Heroic Dragon Soul.This is how my character looked like when I got into the fight, you might go into it with more of less gear. As always, if your gear is different just apply the rules above for potential reforges.
Fight starting in 5..4..3..2..1. Pull.’
First Plate. Before you start the fight make sure to earthshield the tank. As soon as you cut off the cinematic drop your totems and use any shock spell of your choice to any Corruption . Drop a healing rain in between the stacking side where your raid will perform a roll and riptide any member affected by Searing Plasma .(More and more will be affected always start by casting a riptide on them if its of cooldown.) After casting healing rain start relocating to the stacking point and make sure you are gripped. Cast another shock spell to any corruption and depending on your timing either cast another healing rain at your location and drop spirit link totem or vice versa. At that point the rest of the healers will be probably be using their raid cooldowns too. If you are responsible for dispelling get ready to dispel from 1 up to 4 Blood Corruption Death from your team.
TIP: Before starting dispelling, make sure you have 10 stacks of spirit procs from your Heart of Unliving trinket if you have it, and drop your mana tide totem. It will help you as well as the rest of your healing team regenerate as much mana as possible while save you a lot of mana too. Using this method I am left with more than 70% mana after I am done with dispelling if not even more.
The Blood Death debuffs, will all start at 15sec and every time you dispel them that time will decrease. The debuffs will not all start at the same time but very close together so make sure to always dispel the one that has the least time left. At this point you need to concentrate at first getting rid of any Blood Deaths as they will cause an instant wipe if their timer runs out. As soon as they start mutating to Blood Earth you will need to try and dispel them from every member they might jump to until they land to any of your tanks and let them safely expire there. When they expire they will leave each one stack of Blood of Neltharion buff.Once you have 2 stacks on each of your tanks you can let Blood Earth expire in any member of your choice.
TIP: Its very hard to get both of your tanks to have 2 stacks each at the first plate but doable. However if you are straggling for mana make sure the tank that is responsible for tanking the bloods has priority and also make sure that you wont get to the third plate without having 2 stacks in each tank since they will require more and more healing.
Use your Spiritwalker’s Grace to take advantage of the 4pc bonus that will give you extra haste and begin a rotation of
1. Casting lightning bolts to the Amalgamation your tank is tanking while,
2. Making sure you keep up with his earth shield
3. Your own water shield
4. Recasting any missing or destroyed totems
5. Casting riptide on cooldown if possible on any members that just got the Searing Plasma debuff or the tanks if everyone is off the loop
6. Throw any shock spell of your choice at the Amalgamation and cast either healing rain or greater healing wave to whichever member has the highest stacks of Searing Plasma. You will be able to rotate through those 2 if you keep your cool. Note that of course you can break this theoretical rotation at any given point that a) any member is gripped for more than they should since you will need to shock heal them to keep them alive, b) if for some reason the tank needs extra healing.
Keep following all of the above up until the first Amalgamation explodes. As soon as it does your dps will kill the last Corruption thus landing you with a Blood Death debuff to dispel. Be ready for it but at that point you don’t need to panic like before , if you handled 4 earlier this one will seem like a walk in the park. If you used your Spiritwalker’s Grace when I suggested earlier then you will have it again shortly after the first round of handling one of the Burning Tendons. Continue as above until the second Amalgation exlodes and deal with one more Blood Death dispel.
TIP: Try and dispel as much as possible and experiment at the first plate where healing is not as intense. You will notice the difference as soon as you step on the second and third plate when you will need to heal more and you wont have to deal with as many dispels.
Second Plate. Same exact logic as with the first plate with 2 differences.
1. You will notice that its much harder to keep your raid alive while rolling. Make sure your timing at dropping spirit link totem is on the spot.
2. There will be one less Blood Death to deal with since now there are only 3 Corruptions to kill.
3. You might get a delayed Blood Death debuff applied so I suggest waiting a few seconds before popping your Spiritwalker’s Grace. You want to take advantage of that haste in order to get as much mana back as possible and wasting it while you are dispelling will reflect on your regeneration.
4. Overall dealing with Blood Deaths will be easier because a.) They are less and b.) You will most likely have already dealt with applying stacks to the tanks so as soon as they mutate to Blood Earth you will not have to worry about them anymore.
Third Plate. The hardest plate to handle since you will have 20% reduced health pool and an immense amount of bloods that are threatening to either kill your tank or get out of aggro control. Be ready to heal fast whomever needs it and try to always be in control of the Searing plasma debuffs. It’s very easy to lose a member that is gripped at this point due to the fact that he wasn’t knocked out fast enough while having a high amount of time still remaining on his Searing plasma debuff along with his 20% or 25% reduced health pool. Be on the lookout for any bloods running towards you and if this happens run towards the tank that is supposed to tank them in order for him to take aggro of you. As always remember you need to dispel an additional Blood Death when the Amalgamation dies.
This concudes this guide for the Spine of Deathwing HC .Enjoy the fight and happy looting!
I will leave you with a screenshot of my UI while in fight for a better understanding of how important it is to configure your Vuhdo before hand. Numbers are flying and generally its chaotic so the easier you make it for yourself to successfully dispel without errors the better it will be for you and your raid.

Riding the Omnipotent Healing Train Towards Mists
As Mists of Pandaria are approaching, I enjoy roaming around various healing blogs /Blizzard forums and read all about my fellow health bandaging administrator complaints. I love it. It’s the coffee I don’t drink . Be it shaman, druid, priest or paladin ( and soon to be monk ) they all share the same grievance at the end. ( Among other legitimate complains.)
“Why can’t my class be good at everything?”
I can break it down to various complaints from current healing classes but I will not. I fear I will be dragged down too deep to ever get out. I can talk about shamans though. Latest scoop. Shamans are complaining these days about how they are the only class that does not get a targeted damage reduction cool down.
Of course, this is a generalization. I could go in depth about every class’s weaknesses. I realize some abilities need fine tuning. Hell, some need to be tossed out of the window completely. And I’m not saying that there aren’t problems that need to be addressed. Of course there are. There will always be. But the solution is not to give to everyone omnipotence . I have grown sick and tired of everyone treating the healer placement as part of some imaginary ironman challenge that urges them to reach to the top before anyone else. I think healers have forgotten what our class is all about. Healing is not about who has the best numbers. Do I love it when I come on top? Of course I do, I am very competitive after all. But what we need to realize here is that as healers we are only competitive to ourselves. To our last performance. It is not a dps race. Dps are designed to compete with each other. Healers are designed to work as a team with each other. Dps goal is to down the boss as soon as possible while following it mechanics, healers are supposed to keep the raid alive. Complement each other’s abilities, work as partners . No, I don’t want as resto shaman to get a targeted damage reduction cooldown, I don’t mind being the only healing class that doesn’t have one.(Unless Blizzard decides to make Boss encounters that will absolutely require healers having one. And then my raid leader will notify me I m being out not because I m not good enough but because what can you do, you need a targeted damage reduction CD for progression. I will be a sad panda for that. No pun intended.)Not all the healers should have the same exact abilities only named differently. I wanted to get a damage reduction cooldown period as a class and spec because we had no mitigation whatsoever. On hagara I would be second to damage and healing received after the tank. If I got more than 2 stacks of lances I was as good as dead. On lightning phases I would die while chaining as elemental and that would be after I had dropped glyphed stoneclaw totem, self healed and stood away from the crap .Thank you blizzard I will cherish the personal damage reduction CD I got but no thank you on receiving a targeted one. Why would a shaman want to heal as a druid? A paladin as a priest? Why would you want to have the same abilities as them? I love healing alongside my fellow healers. I love that we have somewhat clear placements and directions according to our class. What would happen in a raid when a tank drops to 20% and you have a priest a druid and a shaman with similar abilities competing for numbers?

I could see it happening. All healers rushing to bring the tank up while forgetting that their uniqueness and cooperation is what keeps the tanks and the raid alive. This is an extreme scenario of course that doesn’t correspond to reality. But it shouldn’t take too long to realize what could happen if we went down the road of loosing what makes our classes so distinct.
I don’t want to have hots as a shaman when a druid can do that so well. I don’ t want to have shields as a shaman when a priest does that so well. I want to do my job and I want my fellow healers to have my back while I am doing it. I want to help them help me. Nobody plays a supporting role to the leading healer. THERE IS NO LEADING HEALER! All the healers stand in the raid as equals to each with their own unique abilities. That is the balance Blizzard is trying to bring. Give the raid a super healer. One super amazing healer that splits himself into 3 and delegates responsibilities to his extensions. Look at your fellow healers as extensions to your own class. Strive to complement each other. Strive to be unique and be proud of your strengths, compete with yourself to become better and feel safe in your weaknesses because your healing team has your back.
PS : Don’t stop giving feedback for actual problems that need addressing. Just be smart about it.
Heroic Warmaster Blackhorn 10man Resto Shaman Pov
Welcome to Dragon Soul Heroic mode for Warmaster Blackhorn. In this guide, I will run you through everything you need to know about how to best utilize your Resto Shaman spells and abilities for a healing showdown.
Once again Blizzard is not failing to fail us at what a heroic version of a fight should actually entail. Bring back Ragnaros HC! That was an amazing idea. In any case lets get back to boring funship. You are now faced with the fact that, besides everything that is going on around you, flames are spurring under your feet that eventually npc’s will extinquish. Of course, the ship is after all being attacked. What is more Goriona will also land on second phase. Other than that, its another day at Dragon Soul as usual.
Strategy-wise this is yet another heroic fight where you need to drop one healer in favor of one dps. Be prepared to discuss your raid cooldowns with your fellow healer and your tanks. You will need to rotate them for every Twilight Onslaught that Goriona lashes at you.
TIP. There are reported bugs of the fire visually stacking on the deck while physically is not doing any damage. It’s hard to guess where those patches would be making stirring around them very difficult. A solution is to reset the mode to Normal and then set it back to Heroic. This will momentarily fix the bag but it’s bound to be back with a vengeance. Also, you can’t switch back and forth instantly , you need to wait 5 min, so take your regular breaks on those resets.
While not many things change you need to be careful of how people absorb those Twilight Barrages, since now they are placing a 15 second debuff on players that increases shadow damage taken by 50%. This debuff can stack. So always put 2 people on each one that don’t already have it. It’s easier than it sounds. You don’t actually have to absorb that many.
TIP. Do not absorb any before any Twilight Onslaught unless you have to and absolutely avoid any Blade Rushes from Twilight Elite Dreadblade and Twilight Elite Slayer adds.
During phase 2, Goriona will land and she needs to be tanked. She has two abilities during this phase:
-
Twilight Breath (10-man/25-man), which is a standard frontal cone breath attack;
-
Consuming Shroud (10-man/25-man), which is a debuff that Goriona regularly places on a random (non-tank) raid member. The debuff absorbs a moderate amount of healing (100,000 in 10-man and 150,000 in 25-man). Any healing done to players affected by the debuff is also mirrored as damage to the entire raid (except for the player affected by the debuff, who does not get damaged). For example, a 5,000 heal on the player will deal 5,000 damage to each raid member.
TIP. You will want to utilize as much as possible of your AOE heals for this phase.Healing rain is excellent since you can position it to include all 10 members of your party if not at least all the ranged that will be stacked on you. Move in unison avoiding Shockwaves.Put down 2 markers that will be at the far edges of your healing rain.These will serve as the outmost points where your raid will stack. When a shockwave hits one just move to the other.
Preparation
For a more in depth analysis of exactly all Warmaster’s old abilities I suggest reading the following guides.
1. Guides for Normal Warmaster Blackhorn
Warmaster Blackhorn 10Man Normal by Type H for Heals
Warmaster Blackhorn 10Man Normal And Heroic by IcyVeins
TIP : Always watch some videos beforehand to be in the know.
2.Videos for Heroic Warmaster Blackhorn
Warmaster Blackhorn 10Man Heroic Dragon Soul FATBOSS
Warmaster Blackhorn 25Man Heroic Dragon Soul LearnToRaid
Suggested Raid Composition
2 Tanks – 2 Healers – 6 Dps
Gear and Reforging Check
For this fight any mastery oriented gear will do again. Personally though I retained my 2005 haste rating since my gear allows me to sustain that haste while stacking enough mastery.
Equip your talent tree with Telluric currents to get mana back as well as do damage and Focused Insight to be able to amplify your healing throughput.
Instant ghost is a must have for this fight but there is no dispelling needed so feel free to remove some points from Improved Cleanse Spirit and Cleansing Waters. Below is an example of how your talent tree should look like.

Below is an example of how your character should look like. Gear, reforging, talent tree and glyphs included.
CharDev Example with 403 gear and reforge details
Haste in this example is as close to 2005 as it gets.
Mastery should be above 19 or as close to it as possible for the extra healing it will provide you.
Spirit is little below 3300 (counting the proc from Heart of Unliving) in order to have plenty to meet your needs.
All items used are from Normal and Heroic Dragon Soul.This is how my character looked like when I got into the fight, you might go into it with more of less gear. As always, if your gear is different just apply the rules above for potential reforges.
Fight starting in 5..4..3..2..1. Pull.’
First Phase.
Drop your totems in the middle of the deck and try to refresh them there or as close as it gets to the middle when they expire or you replace them. Remember to keep your riptides rolling on the tanks or whoever needs it. Shock one of the two adds with any shock spell of your choice and lay on their feet a healing rain. Use greater healing waves to heal up any of your party that didn’t move from the blade rushes (although they really should). Spam lightning bolts in between heals. By the time the rain is expired the first Twilight Onslaught will have made its appearance. If you are in full mana you are doing this correctly. Shock any remaining adds to get your healing rain amplified and ghost wolf towards the Onslaught.
First Twilight Onslaught. Immediatelly after you are in position start casting Healing rain.If you are designated to use your spirit link totem drop it after having cast your Healing rain. This way you get the most out of both spells. If however you find you don’t have time to do both , start by dropping your spirit link then cast healing rain. Try to coordinate yourself however, you will need the extra ticks from the rain before people spread out of it. As soon as Twilight hits, cast 2 or 3 chain heals starting from the lowest always party member and then move out of harms way. While running as always feel free to cast riptides on CD and unleash life.If your tanks need a boost or another party member cast a greater healing wave. As soon as your healing rain is over spam a shock spell to any add and drop another one on the tanks feet.
Second Twilight Onslaught. As always ghost wolf your way towards it, cast an amplified healing rain and if you have time either refresh riptides or cast lightning bolts. As soon as twilight hits drop your Mana tide totem and your Spiritwalker’s Grace and get the hell out of harms way while you chain heal members. Remember if everyone is safe you want to keep trying to fit in as many lightning bolts as you can, you need to get into the second phase with more than 50% mana.
Rinse and repeat for as many Onslaughts you may get although you shouldn’t get more than 4.
Second Phase.
Stay away from the rest of the dps so you can heal them without getting into any of the nasty pools that Goriona leaves on the ground. Ideally you won’t get more than one however. At this point immediately after the tank taunts her and face her away from the raid you will need to stack as close as you can get to one of your prepositioned marks. At this point rotate between your CDs as soon as they are ready, spiritwalkers grace, mana tide totem, spirit link totem. Drop amplified healing rains to your location and in between your marks so it covers them both. Keep dropping healing rain on cooldown, keep members up with chain heals, heal anyone in danger with greater healing waves and help out the tanks similarly. Save your instant greater healing wave to rescue the tank in need. Things to note. You WILL have to find time to unleash life in between all of this panicked healing but always make sure you do it before casting a greater healing wave. Its very important that you keep spamming any add with lightning bolts so you can keep your mana up. With only two healers this fight is bound to take every bit out of your mana pool.
This concudes this guide for the Warmaster Blackhorn HC healing showdown. Enjoy the fight and happy looting!
Heroic Warlord Zon’ozz 10man Resto Shaman Pov
Welcome to Dragon Soul Heroic mode for Warlord Zon’ozz. In this guide, I will run you through everything you need to know about how to best utilize your Resto Shaman spells and abilities for a healing showdown.
I don’t like the fact Blizzard felt we had to fight 2 bosses in the same room. I always feel I’ll either get oozes to spawn or tendons and vice versa. Its disorienting to be in the exact same environment but whatever. Thank you Blizz.
Zon’ozz on heroic features one main difference that will brighten your day. Remember those adds that spawned during black phase? What? You were too busy healing like crazy/ dpsing like crazy/tanking like crazy to remember? I have excellent news for you!They were there! And guess what! You get to fight them in heroic version. Excited? No? You’re more like me then. Hard audience. I’ll just get right to the point.
While the ping pong phase remains almost the same ( my suggestion will be to go for 5/5/5 then kill / kill / kill ) be prepared for even more damage to the tank and get ready to deal with the Disrupting Shadows debuff that now not only deals damage to the affected raid member but also to all raid members within 10 yeards.If and when you get it, it move out of range and dispell.Rule of thumb.
Tip. If you don’t have an addon to display range, Blizzard has its own.Input the following in chat to get yours to pop out.
/range 10
In regards of the new adds that will spawn.
Claw of Go’rath is a large tentacle that must be tanked. If not tanked, this tentacle will deal massive amounts of damage to the raid, causing a fast wipe. 1 Claw spawns in 10-man difficulty. The Claw of Go’rath deals very low damage, and does not need a proper tank. Plate wearing DPS players and Feral Druids can perform this task.
Flail of Go’rath is a small tentacle with little health. It deals damage to random raid members and performs a knockback on players within 15 yards of it. 2 Flails spawns in 10-man difficulty.
Eye of Go’rath simply deals damage to random raid members. 5 Eyes spawn in 10-man difficulty.
Although you should take a look in the videos below for more info on how to handle these adds, my raid has the following strat. As soon as Black phase begins everyone should stack on the Claw .This way healers can lay down all their aoe heals while the tank will take upon the task to tank both the Claw and Zon’ozz. As for the dps assignments. 2 dps will take the closest Flail to their side while another 4 dps divided in 2 groups will take the closest eye to their side. Once those 3 are dead, the group that got the Flail down will split from the group taking one healer with them in order to kill 2 remaining eyes on their side, one of the other 2 dps split to the opposite side to deal with another 2eyes with yet another healer and the last 2 dps along with the last healer will remain in the middle (should be melee) in order to take down both the claw and dps the boss as much as possible. Rinse and repeat 3 times. On the forth pop Heroism , stack on the Claw again ( the tank still needs to tank both of them ) ignore all adds and dps down the boss. Needless to say it’s yet another dps intensive fight and healer likewise.
Preparation
For a more in depth analysis of exactly all Zon’ozz old abilities I suggest reading the following guides.
1. Guides for Normal Zon’ozz
Warlord Zon’ozz 10Man Normal by Type H for Heals
Warlord Zon’ozz 10Man Normal And Heroic by IcyVeins
TIP : Always watch some videos beforehand to be in the know.
2.Videos for Heroic Zon’ozz
Warlord Zon’ozz 10Man Heroic Dragon Soul FATBOSS
Warlord Zon’ozz 25Man Heroic Dragon Soul LearnToRaid
Suggested Raid Composition
1 Tank – 3 Healers – 6 Dps
Gear and Reforging Check
For this fight any mastery oriented gear will do, mainly since during Black phase the Black Blood of Go’rath debuff that exists in normal mode works slightly differently. In heroic mode, this debuff gains stacks, and deals damage to the raid based on the amount of stacks it has (around 4,000 Shadow damage per second per stack). Each tentacle that is alive (Claw, Flail and Eye) applies one stack of the debuff. Killing the tentacles is required in order to lessen the raid-wide damage .It is important to note that the debuff does not deal damage to the raid outside of the Black Phase, but it maintains stacks based on how many tentacles are still alive during this time. When the next Black Phase starts, these stacks will be added to the stacks of the newly spawned tentacles, resulting in higher damage. What this means is that the whole raid will take huge amounts of damage that will bring each member to its feet, namely for the most part of the phase below 50% of their health.Shaman mastery healing here will work wonders while you are progressing, feel free to change to haste after your first kills.
Equip your talent tree with Telluric currents to get mana back as well as do damage before the Black phase and Focused Insight to be able to amplify your healing throughput.
Remove points from your ghost wolf since for this fight you probably will be called to dispel a lot so put some talents to your Improved Cleanse Spirit and Cleansing Waters. Don’t be scared to lose your instant wolf. You will only be running a short distance and at that point you will be sporting Spiritwalker’s Grace anyways.

Below is an example of how your character should look like. Gear, reforging, talent tree and glyphs included.
CharDev Example with 397 gear and reforge details
Haste in this example is as close to 916 as it gets. I’ve removed all extra haste to amplify my spirit and mastery needs.Also the only time you will really need haste will have heroism and spiritwalkers grace to compensate.
Mastery should above 20 or as close to it as possible for the extra healing it will provide you for when your raid hits all time lows. Mastery is a must in this fight since while in Black phase your raid will always be below 50% of health.
Spirit is little above 3800 (counting the proc from Heart of Unliving) in order to have plenty to meet your needs.
All items used are from Normal Dragon Soul.
As always, if your gear is different just apply the rules above for potential reforges.
Preparation Tips and Tricks
Make sure your weapon is imbued with Earthliving Weapon enchant and your Water Shield is up . Put Earth Shield on the tank and try to keep it up at all times .Start overhealing the tank so that your well spent Ancestral Healing talent points will proc that wonderful 10% damage reduction and 10% maximum health pool increase. After you see you can’t climb more on their health cast riptide on him. As long as riptide is ticking the stacks will never drop thus securing the tank an extra 10% damage reduction and health pool increase throughout all the fight.
Fight starting in 5..4..3..2..1. Pull.’
TIP. Depending on what healers your raid is sporting your assignment will differ. Below is my view of the fight from my POV so my spells are adjusted accordingly. I’m stationed in between the melee pile and the ranged pile for 3 reasons.
First so I can spot heal the tank if needed while I’m keeping my earth shield on him and also provide support for the melee pile (with healing but also with dispelling) whilst I am also responsible to take care of my ranged team. (Not as scary as it sounds. Restoration shamans are amazing at multitasking like this. )
Second so I am close enough to roll lightning bolts at the boss to regain my mana as this is the only time you will be allowed to do that.
Third so I am close to enough to spam the shocking spell of my choice to take advantage of my Focused Insight talent and amplify my heals.
Run in and drop your totems at your position after the tank pulls. If you run in before the tank you risk engaging the boss .
TIP. Relocate for the unfortunate event that the Void of the Unmaking spawns towards your direction since it may bounce of your totems. Relocate yourself accordingly allowing the ranged pile to assume your position in that case.
At this point there is no significant damage going out, help the tank healer with the tank, refresh your riptides to members that need it and roll some lightning bolts at Zon’ozz. As soon as you see the Void spawning you have few seconds to :
1.Shock the boss with any shocking spell of your choise and
2.Depending on where you see the ball is heading lay a healing rain under the feet of the ranged pile. This way your healing rain will be 30% stronger.Yes I can’t stress this enough, all it’s ticks will be 30% stronger so consider your GCD well spend.
Ping Pong Phase.
While in this phase make sure there is a healing rain under the ranged pile at all times always enhanced with any shocking spell. So cast it on cool down . Cast riptides on CD also and if you feel your melee pile needs more love cast chain heals to an non riptided member.Turn your attention to the tank and make sure he survives Psychic Drain and is topped off after. Since you keep rolling your riptides on CD and chain healing the melee pile your tidal waves will be up to give you 30% more crit chance to your healing surges and 30% faster greater healing waves. So if you are unsure of your tank cast 2 healing surges at him to keep him alive long enough so you can cast your greater healing wave at ease.
Note. Your tank healer will probably be on top of this so you won’t need to stress as much. Use this time to cast lightning bolts if you can.
Black phase.
As soon as black phase starts the boss will automatically teleport in the middle of the room. At this point there is some dead time where you need to run to your location which is stacked under the Claw with the rest of the raid. You should :
1. Make sure your tanks earth shield has enough stacks, if its under 4 refresh it on the run.
2.Spam once Unleash life on the tank and spam any shocking spell at the boss to activate your Focused Insight proc and pop your Spiritwalker’s Grace. Immediately start casting healing rain at the stacking location.By the time you are finished casting you’ll already be there.
3.In accordance with your fellow healers this is the time to drop your spirit link totem. You can only drop it every other Black phase so either you’ll be called to drop it on 1rst and 3rd adds or 2nd and 4rth.
4.Drop mana tide totem to regain mana while you’re casting and keep dropping it on cd after this. Like spirit link totem it will be back for a black phase again.
5.Shock the claw or the Zon’ozz and cast another healing rain at the melee pile.
Note.Remember. You will be called to dispel Disrupting Shadows every now and then.Remember to check if your raid member is in a safe 10 yards radius before you do.
Now depending on your assignment you will be either staying with the melee pile or called to heal a ranged group that will split after the first adds are down.
Melee group assignment
Shock either the Claw or Zon’zz and cast healing rain on CD. Keep your riptides rolling on whichever member needs it and keep the tank up with greater healing waves. As always if you see any member running low especially the tank cast 2 healing surges to secure them quickly before you lay a bigger spell. Occasional chain heals might help although they are not my preferred spell for this situation.
Ranged group assignment
Transfer your earth shield to any ranged of our team. You heal more any member that you have earth shielded via this talent Nature’s Blessing . Spot heal them with healing surges and greater healing waves.
TIP.Keep your riptides rolling on CD. Yes the GCD is always worth it.Not only they will have a HOT on them to keep them going but this way you’ll always get to keep your tidal waves up making your greater healing waves 30% faster and give your healing surges 30% chance to crit. Overall win win.
Once the Black phase is over relocate to your original assigned position. Top off any member needed. If its ranged pile lay a healing rain, if its melee chain heal or spot heal of your choice.Remember to earth shield the tank if it has either run out or you had it on a ranged member. Assume your “healing rotation” since at this point effectively you are at the beginning of the fight again. Rinse and repeat 4 times.
Fourth set of adds.
As soon as the 4rth series of adds spawn pop Heroism and stack on the Claw again .Everyone at this point will ignore all adds, except for the tank that will still need to tank both the Claw and Zon’ozz. This will be very intense healing phase seeing as the adds will keep damaging your raid constantly until the boss dies. Your mastery is going to help you with this phase keep casting healing rains at your location and chain heal in between. Hopefully you will have enough mana to keep you going until its over.
This concudes this guide for the Warlord Zon’ozz HC healing showdown. Enjoy the fight and happy looting!
Heroic Ultraxion 10man Resto Shaman Pov
Welcome to Dragon Soul Heroic mode for Ultraxion. In this guide, I will run you through everything you need to know about how to best utilize your Resto Shaman spells and abilities for a healing showdown.
And so you come to face the ultimate creation of Deathwing. You’d think he would show more appreciation about his wife son and daughter, his own family, but no. Before the fight starts he makes it very clear.This dragon is his pride. Like a dog if you will. Faithful puppy. Only tad bigger.Makes you wonder what he might eat for breakfast. For now his appetite consists of you and your party. Fear not however because once again you find yourself in the company of the four aspects. And Thraal. No comments. In the heroic version of this fight not many things change. He hits you harder, has a tougher enrage timer to beat which is complicated by his upgraded health pool and of course, now 2 additional players need to soak each Hour of Twilight while the tanks and the dps try to handle additonal Fading Lights by using Heroic Will .Take into consideration that this time you only have 3sec down from 5sec before you lay your bones to rest when Ultraxion casts Hour of Twilight. Other than that as a healer, like in normal version you only have to be concerned about Hour of Twilight since yet again you won’t be affected by Fading light.
Note. Keep in mind that depending of what addons you’re using Heroic Will button might not be visible. Or if you are like me you don’t want to drag your mouse all over the screen while healing. So make the following macro and bind it to the key of your preference or even your mouse.
Specific Dragon Soul Macro ( For Utraxion and Madness of Deathwing special button )
/click ExtraActionButton1
Preparation
For a more in depth analysis of exactly all Ultraxions old abilities I suggest reading the following guides.
1. Guides for Normal Ultraxion
Ultraxion 10Man Normal And Heroic by IcyVeins
Ultraxion 10Man Normal by Type H for Heals
TIP : Always watch some videos beforehand to be in the know.
2.Videos for Heroic Ultraxion
Ultraxion 10Man Heroic Dragon Soul FATBOSS
Ultraxion 25Man Heroic Dragon Soul LearnToRaid
Ultraxion 25Man Heroic Dragon Soul Tankspot
Suggested Raid Composition
2 Tanks – 2 Healers – 6 Dps
Gear and Reforging Check
For this fight, you will need to be able to sustain your mana all the way through the encounter up until the end the 5min mark when Ultraxion will start to cast his Unstable Monstrosity ability every second.This means that probably since you’ll be spamming healing rain and pretty much everything else you can afford before you down him you will be gasping for mana.There are ways to make your life a little easier and your spells more effective.
Before the 5min mark even though you will be 2 healing it be prepared for minimal damage or for what I would call dps time. Not only because you’re bored but also because your raid will probably need your 3 – 5k dps you will provide. Equip your talent tree with Telluric currents to get mana back as well as do damage and Focused Insight to be able to amplify your healing throughput.
You will be stationary for the whole fight so feel free to sacrifice your ghost wolf and since no dispelling is necessary remove a point from that too. If you are progressing on Ultraxion with minimum gear, you and the rest of your team , then probably you will want to invest some points in your elemental tree (2 points in Acuity,3 points in Concussion, 3 points in Elemental Precision ) to achieve 2 things. Higher dps from you and higher mana return from your lightning bolts. If you are looking at his after the % nerf or your gear is higher then feel free to leave your talent tree as is.

Below is an example of how your character should look like. Gear, reforging, talent tree and glyphs included.
CharDev Example with 397 gear and reforge details
Haste in this example is as close to 916 as it gets. I’ve removed all extra haste to amplify my spirit and mastery needs.Also the only time you will really need haste is after the 5min mark of the fight were you will have heroism and spiritwalkers grace to compensate.
Mastery should above 20 or as close to it as possible for the extra healing it will provide you for when your raid hits all time lows. Mastery is a must in this fight since your raid after the 5min mark will always be below 50% of health.Its scary I know.But you’re a shaman. embrace your mastery and watch your numbers fly.
Spirit is little above 3800 (counting the proc from Heart of Unliving ) in order to have enough to dump at that late stage of the fight. Believe me, you will not have time to cast lightning bolts to get any back.
All items used are from Normal Dragon Soul.
As always, if your gear is different just apply the rules above for potential reforges.
Assigning the Healing Buffs
There is often a disagreement on which crystal a shaman should take in this fight. As you know they are 3. The red buffs you with Gift of Life which provides a 100% increase to all the healing done by the affected player(s). The green buffs you with Essence of Dreams which provides valuable AoE healing, which will prove extremely useful, especially as the encounter progresses. Note that this buff applies to most types of heals, including HoTs and AoE heals (such as Healing Rain). Finally the blue buffs you with Source of Magic which provides increased casting haste and reduced mana cost, making it desirable to all healers.
So which one should you take? Lets start with the one you shouldn’t which is the blue. As you and most other healers will have either the Red or Green buffs by this point, the Blue buff is most desirable to Holy Paladins, who can practically spam Holy Radiance until the end of the fight, generating a huge amount of AoE healing. So unless there is no paladin in your team just erase the blue crystal of your mind.
As it goes for red or green. Both are excellent for shamans but my choice of preference will be green. You see with red yes you get a 100% increase in all your spells.That means 100% increase in all healing rain ticks, in all riptide , in chain heal. Sounds nice? However think of this. How much nicer does it sound for every greater healing wave to become instantly your new aoe spell? At the end of the fight you will be spamming healing rain and chain heal like crazy if you take the red. But if you take the green you’ll be cruising with healing rain ( that heals the same either with red or green) and greater healing waves. Every healing wave will hit all your raid making it much greater than ANY buffed chain heal would even be. Also think of this. If you are healing with a paladin they will not be healing the tanks at all at the end since they will be spamming Holy Radiance .This is where you come to steal the show with healing the tanks with greater healing waves which since you have the green buff will ultimately heal the raid also with an insane amount. If you need further proof feel free to check WoL with top healers. Paladins rule the first pages then come shamans with Essence of dreams in their highest heals having taken green buff.There is no red buffed top shaman healer. You will not fail with red, but green is definitely a winner for you.Let the druid take the red then the blue and enjoy them.
Top 2 Shaman healers as found in WoL‘s page for top healers for Ultraxion HC 10man.
Gravatize his logs found here with 74.645k hps had 17.3% based on Essence of dreams.Used green buff.
Voidwalker his logs found here with 70.055k hps had 32.5% (making this by far his first healing spell) based on Essence of dreams.Used green buff.
Preparation Tips and Tricks
Make sure your weapon is imbued with Earthliving Weapon enchant and your Water Shield is up . Put Earth Shield on the tank that is currently tanking and try to keep it up at all times .Start overhealing the tanks so that your well spent Ancestral Healing talent points will proc that wonderful 10% damage reduction and 10% maximum health pool increase. After you see you can’t climb more on their health cast riptide on them.As long as riptide is ticking the stacks will never drop thus securing the tanks an extra 10% damage reduction and health pool increase throughout all the fight.
Fight starting in 5..4..3..2..1. Pull.
You have quite a lot of seconds before Ultraxion hits you with his first Hour of Twilight that you will need to avoid using Heroic Will.
Note.Shamans have no mitigation making us bad candidates for staying out with the other 2 designated dps or tank to absorb Hour of Twilight .
You should put your totems down before Ultraxion lands and lay a healing rain .Make sure you stay behind or at the sides of your raid at all times if you have Maw of the Dragonlord equipped. Start spamming Ultraxion with lightning bolts and depending on the situation this will be your priorities :
Before and up until 5min mark :
1.Healing rain
2.Lighting bolts if nobody needs healing or if healing is sufficient.
3.Riptide on cd on the tanks and earth shield on the current tank or at least the main tank.
4.Chain heal if you think healing rain will not top off your raid in accordance with your fellow healer or greater healing wave if you see the tank falling a little too low or people coming out of soaking hour of twilight. Keep your riptides rolling to keep up with your tidal waves (healing rain DOES NOT consume one charge) or chain heal to bring them back up.
After 5min mark :
1.Healing rain on CD,make sure you use any shock spell you might have before that if you feel you can afford the GCD to amplify it.
2.Healing waves on the tanks if you have green buff. If you have red buff forget that spell and move on to…
3.Chain heals.
At this point its only a matter of if you can afford the GCD’s to maintain earth shield and riptide and my only advice is head into the fight and after few wipes you will know for yourself.
About your CD’s.The fight will last from 5:00 min to 6:00, usually varying around 5:30. Your mana tide totem has a 3 min cd which means you can only use it 2 times into the fight.Drop it a little bit before 2 min into the fight and then again a little into the 5th min.This way you will utilize your 2pc set bonus if you have it. Use your spiritwalkers grace at 1 min mark,3 min mark and just after heroism has faded( around 5:30min mark) or a little before that to gain that extra haste you will need for the last phase. As for your spirit link totem , use it whenever you feel like to but make sure you have it for around 5:30min mark into the fight in accordance to any raid CD your fellow healer has and after Nozdormus Timeloop buff has faded from most of your raid.
Note. About heroism there is a nice trick quoting Malevica from Type H for Heals:
The double-lust trick
You have a dilemma: you really want to give the healers the Bloodlust or Heroism or Time Warp for the end of the fight, but the best time to use it is the very start, where you can line up BL with trinkets, pre-pots and DPS cooldowns.
But you can have your cake and eat it too! Heroic Will takes you into a different realm, so you can’t be affected by buffs or debuffs,including BL and Heroism.
So here’s how to use this to your advantage:
1. Have a countdown timer for pulls. (You already have this though for timing pre-pots, right?)
2. 2 seconds before the pull, have your healers hit Heroic Will
3. Just as the pull is made, pop BL/Heroism/Time Warp. Your healers won’t get the buff but they don’t need it, and crucially they also won’t get the associated debuff
4. At the 5-minute mark, pop a second BL/Heroism/Time Warp so the healers can benefit from it
This concudes this guide for the Ultraxion HC healing showdown. Remember to use your Heroic will a second before Ultraxion casts Hour of twilight. Enjoy the fight and happy looting!
The Sixth Meme
And so horror of horrors I’ve been tagged by Malevica of Type H for Heals to continue the tradition of the Sixth Meme challenge.
-
Go into your image folder.
-
Open the sixth sub-folder and choose the sixth image.
-
Publish the image! (And a few words wouldn’t hurt, though I dare say I couldn’t stop a blogger from adding a few words of their own.)
-
Challenge six new bloggers.
-
Link to them.
Why am I horrified? Because I’m not what you’d call a traditional WoW player. Case and point. I don’t even have folders in my screenshot folder except for what I use in this blog .LOL.Epic fail. I looked and I have only one.One sad lonely screenshot staring at me with big brown eyes. There is a funny twist though. See the only reason I even have that, is simply because I was ASKED. By a GM. Who wanted me to screenshot my interface and send it over as proof of the game settings not functioning for me and see if Blizzard could fix it. So there. Ah and also if you check the chat. The idiot of my previous guild master who got a kick out of kicking people out the guild. Cause he is a primo douchelord. Yes I’ve said it.

So what can a blogger do when confronted with such a problem? Yes that’s right. I leeched of my friends. And I’m bloody proud. Like a true leech. Bloody. Get it? For the love of God I’m so sad sometimes.

Funny moment after killing Valiona and Theralion in BoT with our alts. They dropped in a Yin Yang position and as an added bonus they also seem to be kissing.Awwwhs. Oh wait a minute.Aren’t they like brothers and sisters? Sick Blizzard. But that could be considered ok in the Dragon world. My cat had definitely a thing for his mom. Image courtesy of one of my closest friends in WoW. Also he’s the druid I keep molesting in my blog which he doesn’t read because I believe he gets nagged enough by yours trully already while in game.

And what do we have here? Vanilla WoW. Back then I didn’t even know WoW existed. Luckily another close friend of mine was playing and captured this. Flying Hordie. In the middle of Stormwind. When he proudly send me this screenshot I believe my thoughts were “Ok. Ummm. Thanks for nothing “. Silly me. He spend half an hour explaining to me that in vanilla NOBODY flew.So this was a bug.And an extraordinary one to be exact.A memorable moment. People actually running to see the flying mount! Ahhh yes. This is exactly how kids with iPhones feel when their moms go “When I was your age I had a penpal that we used to write letters to each other!”.And the kid goes. Huh?
And last but not least I’ll leave you with something to think about. I may not have WoW screenshots in my pc folder.But I have other shots I would say are even more delightful. I present you my addiction. CHOCOLATE.My luscious profiterole. I made it. I photographed it .I ate it. Good times.

I’m supposed to tag six more bloggers. I think everyone has already done this but if you haven’t and you’re reading this consider yourselves tagged.
Heroic Yor’sahj The Unsleeping 10man Resto Shaman Pov
Welcome to Dragon Soul Heroic mode for Yor’sahj The Unsleeping. In this guide, I will run you through everything you need to know about how to best utilize your Resto Shaman spells and abilities for a healing showdown.
Yor’sahj The Unsleeping has, much like Morchok The Douchekeeper , one main distinction from normal mode. It appears that he’s inspired by Alien so he spawns 4 oozes at a time instead of 3 hence leaving you with the option of having him absorb 3 at the end of their trail rather than 2. I remember when I first saw the normal version in PTR and in various early videos I was left thinking that blizzard has a sick sense of humor. Much like real life. Where you THINK you have a choice when in reality you have almost none. There are 6 combinations that you will encounter randomly in no specific order in this heroic mode fight and in each you have mainly only one choice of what to kill. It sounds scarier than it actually is however.In order to help you with that I suggest installing the addon called Yor’sahj Automatic RaidWarnings that calls out which ooze to kill and lets you know which ones are left.
The Contenders
Purple – Gives everyone (except pets) Deep Corruption. Every time someone is healed, they get a stack. If they reach 5 stacks they explode, doing massive damage to the raid.
Red – Yor’sahj will cast Searing Blood on 8 random raid members, doing more damage the further away they are.
Green – Yor’sahj will cast Digestive Acid, which does moderate damage to random targets which will splash to everyone within 4 yards of them.
Yellow – Gives Yor’sahj Glowing Blood of Shu’ma which makes him attack 50% faster and use his abilities twice as often.
Blue – Creates a mana void. This will drain everyone’s entire mana pool. When it is killed it will explode and return the mana to everyone within 30 yards.
Black – Spawns small adds which will focus on random targets and use Psychic Slice.
Preparation
By this point you should have run at least once the normal mode of this fight. If you were thrown in the heroic version and you need a catch up below are some guides to help you better understand all the in and outs of this boss and for a more in depth analysis of what each ooze will do.
1. Guides for Normal Yor’sahj
Yor’sahj The Unsleeping Normal Mode from Icy-veins
Yor’sahj The Unsleeping Normal Mode from Type H For Heals
TIP : Always watch some videos beforehand to be in the know.
2.Videos for Heroic Yor’sahj
Yor’sahj The Unsleeping 10Man Heroic Dragon Soul FATBOSS
Yor’sahj The Unsleeping 25Man Heroic Dragon Soul LearnToRaid
Yor’sahj The Unsleeping 25Man Heroic Dragon Soul TankSpot
TIP : For this fight specifically it’s very important to be able to properly handle Deep Corruption so you will need to have it showing on your healing addon raid frames. The spell ID is 105171 and it’s name is Deep Corruption. If you have VuhDo just go to your configuration screen on the Debuffs tab and then click on Custom. Make sure you have Stacks clicked on both columns then go and find the spell from the dropdown list.

Suggested Raid Composition
1 Tank – 2 Healers – 7 Dps
Gear and Reforging Check
For this fight, you will need to be able to dump your mana fast enough in very little time in order to heal your raid. This boss is characterized of the huge amounts of dead time that provides to the healers, making this fight especially easy for Resto Shamans. Equip your talent tree with Telluric currents to get mana back when no healing is needed and Focused Insightto be able to amplify your healing throughput.You will mostly be stationary for the whole fight so feel free to sacrifice your ghost wolf and since no dispelling is necessary remove a point from that too. Below is an example of how your character should look like. Gear, reforging, talent tree and glyphs included.

